The 12 Steps of Rain Harvesting
However, this alone cannot be relied upon to deliver the volume and quality of water you need.
Instead, follow the 12 Steps to ensure your rainwater harvesting success. This approach has been built from over 25 years of knowledge and experience, cultivated from a devotion to the craft of rain harvesting and rigorously testing the process in the harshest environments.
STEP #1
Understand your rainwater needs
When it comes to Rain Harvesting, there are two operative words we use when determining more measurable goals – Quantity and Quality.
How you plan to use your rainwater and how much you need for that use are the cornerstones in your decision-making when building an effective rainwater harvesting system.

How much can I collect?
Since you’re collecting rainwater, it is imperative to understand the seasonality of your local area and how much rainfall fluctuates throughout the year. Average rainfall data is available through your local council or the Bureau of Meteorology. With this information, you’ll be able to anticipate your water position to make sure you don’t get caught without.
From here, you need to establish how much water you can actually collect from these conditions.
This is dependent on the size of your roof, and how it is being directed to your tank. As a general rule of thumb, for every 1 millimetre of rainfall, you will collect 1 litre of water per square metre of the collection area. For example, if it rained 100mm in a month, you could potentially capture 13,000L from a 130m² roof.
Next, you’ll need to assess if this is enough for your needs based on your water usage. If not, then we need to increase the collection area to make up for the shortfall. If you’re unsure, our mass balance tool can help your calculation.
Your ability to capture water is also contingent on your capacity to store the water, which we’ll address in greater detail in Step 2.
What are you going to use your rainwater for, and how much do you need?
Specific is terrific. The clearer you are on the intended use of your rainwater, the more efficient your rain harvesting system can be. Understanding what you’re going to use the water for will help to inform quality requirements and how much water you need.
To determine how much you need, simply check your recent water bill to see how much you use. Alternatively, you can get a snapshot of your water usage by using our mass balance tool.
The tool guides assess your water applications and how much water you might need to use. It addresses location and seasonality so that you can determine what your water balance is throughout the year to make sure you’re not caught short.


What quality of water do you need?
If you’re using rainwater for irrigation and other outdoor purposes, you’ll only need to do a minimum amount of work to bring it up to a moderate level. Minimal filtration is required as the key is keeping our larger debris to ensure pumps are protected and irrigation equipment can function smoothly without the risk of blockages.
For use with internal appliances, such as washing machines, and toilets – you will need to attain a higher level of water quality to minimise water colour and odour.
If you’re planning on using rainwater for all purposes, especially drinking, the system will need to be designed to achieve the highest quality and best tasting water by eliminating any remaining sediment before use.
When planning your system, It’s important to begin with the end goal in mind. By understanding your environment, you will be better able to understand what is feasible for your property. From there, you can purposely build the system around your usage requirements to maximise the quantity and quality of water available to you at any time. That’s peace of mind.
STEP #2
Store your rainwater
Make the right choice for your property.
Choose an appropriate storage vessel for your needs.
It’s important to reiterate that your ability to capture water is also contingent on your capacity to store it, this is where you need to look at the makeup of your property, and the storage vessels themselves.
If you are just getting started, or only require a small amount of water, then a rain barrel or smaller tank will get the job done.
However, if a higher quantity of water is required, we have a variety of options that can help you achieve your goals.
Choosing the best storage vessel
Depending on the aesthetic of your property, and the space you have available, you may opt for an above-ground tank or an in-ground tank.
In-ground tanks can help to save space at ground level, and because they tend to sit much lower than the house, it can make it much easier to have a good amount of fall from the gutter to the tank inlet. This might allow for a much larger volume tank, where an above ground tank might be limited by the height of the house.
")

When it comes to shape, it’s important to consider space. If your property has limited space, and tight specifications, then you may prefer to opt for a slimline tank that can hug the side of your house. However, if you have more space and flexibility – you can opt for a classic round tank, and increase your storage capacity.
Whatever your choice, it is important to note that you can connect multiple smaller tanks to increase your volume if your requirements change. This is dependent on the shape and size of your space.
Consider the whole system.
When connecting your roof and downpipes to your tank, there are two main systems – Dry and Wet.

Dry System
A Dry System enables water to flow directly from the roof to the tank. There are no upward sections in the pipe so water is never stored in the pipes, as they completely drain every time there is rainfall.
Dry Systems are often simpler to install with existing buildings and can be achieved by re-routing a few pipes, with minimal plumbing or groundwork required. However, depending on the roof style you have, like gabled, it might be difficult to connect a large area of the roof to the tank.
In this case, if you need to increase your collection area, then you might need to consider a wet system to set you up for more water capture.
Wet System
Wet Systems (or Charged Systems) enable you to connect much more of your building to the tank, maximising water capture.
This is achieved by connecting pipes that come from the building, into the ground, and then back up to your tank. These are often easier to set up on a new site, as the pipes need to be routed underground to get back into the tank.
")
Once you have determined the appropriate system and storage vessel for your property, it’s time to assess and prepare your roof or collection area to get the best quality rainwater.
STEP #3
Assess your rainwater collection area
Audit your roof, gutters and surrounding environment to prepare your property for rainwater collection.
When assessing your rainwater collection points, there are three main areas to consider – the roof, the gutter, and the surrounding environment.
Roof
This step is all about setting you up for success from the main collection point. The roof plays an integral role in your rainwater system, as it is the first zone that the water comes into contact with.
You need to assess the risk for a variety of pollutants that can wash into your system.
The main factors you need to look out for are;
- Lead paint and flashings
- Flaking or corroded material
- Cracked tiles
If any of these are found during your initial inspection, it is recommended you replace or fix them before progressing with any collection.


Gutters
The next area for assessment is the gutter. Similar to the roof, you need to be on the lookout for any flaking material or signs of corrosion that can lead to contaminants entering your system.
Furthermore, you need to ensure there are no opportunities for water to pool, which can cause corrosion and provide an environment for mosquitoes to breed.
The primary cause of water pooling is a damaged gutter or one where the fall is not adequate to allow for sufficient water flow to the downpipe. Spray water into the gutter with a hose to assess the situation and adjust or replace gutters where required.
Environment
Once the roof and gutter are assessed and cleared, it’s important to look at the surrounding environmental factors that can affect your rainwater quality and the strategy for your system.
Inspect your roof for any moss or heavy organic build up. If found, it is recommended to get the roof professionally cleaned.
If you have overhanging trees, it is important to trim them back to prevent leaf litter from landing on your roof. Alternatively, you can install gutter mesh to reduce leaf load as much as possible, while also preventing any wind-blown leaves from surrounding properties or trees from depositing and breaking down in your gutters. This can lead to gutter damage, corrosion, and blockages if not resolved. Reducing the volume of leaves at the roof plays a huge part in reducing the debris load throughout the entire system, which means better water and less maintenance of your system.
Gutter mesh is also instrumental in preventing pests and embers from entering your gutter system and roof cavity, and further protects your property.

Once the collection area is deemed suitable to capture rainwater, you can move forward with designing your system.
STEP #4
Clean your rainwater:
Filter leaves and debris
Keep leaves and debris out of your rainwater system.
This is a crucial part of the 12 steps, as you begin to install and introduce filters that progressively improve the quality of water as it travels to to your tank.
Leaves and debris can threaten your rainwater quality and quantity. In fact, they’re the root cause of many rainwater collection issues, from rainwater contamination to obstructed water flow to your tank, and almost everything in between.
An accumulation of organic matter in your pipes will negatively affect the quality of your water. As the leaves break down, they will start to make the water “go off”through the process of anaerobic fermentation – whereby microbes in the system can start to consume this organic leaf matter, which can affect the colour, smell and taste of the water.
Outside of this, leaves can contribute to clogging pipes which will prevent you from capturing water, and can cause localised damage or flooding.
Because of this, filtering leaves and debris to keep them out of your Rain Harvesting system is vital. Filtering should be used at any potential leaf and debris entry points to provide layers of protection across your Rain Harvesting system.
The easiest solution is to install a rain head with mosquito proof mesh on each downpipe – this will prevent leaves from entering the system with the added benefit of preventing mosquito ingress.
Rain Heads
Rain heads are your first port of call when it comes to filtering out large debris. They come in all shapes and sizes to fit your system of choice. There are styles with angled screens that are designed to eject leaves and reduce the amount of maintenance required. Alternatively, there are bucket-style rain heads that ensure you can catch every drop of water but do require some maintenance to ensure they don’t fill up with debris and overflow.
Rain heads are important for all systems. They are especially critical on wet systems and charged lines to prevent organic matter build-up in pipes, and prevent mosquitoes from entering your pipework.


Tank top screens and filters
As an alternative to a rain head on your downpipe, you might choose to only filter leaves at your tank. You might not have much height between your gutters and your tank top, and this can make installing a rain head tricky.
If this is the case, a tank screen or other tank top filter can prevent leaves from entering your tank. Keep in mind that this arrangement is better suited to dry systems where it is less likely for leaves to be sitting in pipes.
Left unchecked, leaves and debris can be the root cause of many collection issues. By simply applying this step and putting the appropriate measures in place, you can be confident your Rain Harvesting system is better prepared to give you cleaner rainwater and lots of it.
STEP #5
Clean your rainwater: Divert the First Flush of rainwater
Use first flush diversion to channel, capture, and isolate the most contaminated rainwater from your roof to divert it away from your tank.
In Step 4, the focus was to remove the larger contaminants and debris. From here, the goal is to put measures in place to further remove fine sediment, dissolved solids and any other deposition that can come from your roof surface at the start of a rainfall event.
After a period of no rainfall, debris accumulates on your roof. Once it begins to rain again, this debris will then wash into your system, unless you divert the first flush. First flush diverters play a vital part in any Rain Harvesting system, stopping dirty or hazardous particles and finer matter from flowing into your system, and contaminating your rainwater supply.
However, it doesn’t need to go to waste, as you can then manually empty this water or automatically release it into stormwater or your garden.
Protect your water supply from pollutants
The two main types of pollutants are dry deposition and wet deposition.
Dry deposition is matter which builds up on your roof over time, including dust, dirt, leaves, droppings or other animal matter. If you leave near industrial areas or even busy roads, particulates can be thrown into the air also and deposit on your roof surface.
Wet deposition is that which is pulled from the sky as it rains, hence it is ‘wet’. These might include smoke, airborne pollution from industrialised areas, acid rain, and even jet fuel if you live near a flight path.
In a period of no rainfall, this dry deposition can build up over time on the collection surface or roof. Then, when it rains, this matter is washed into your system. Typically, the bulk of the matter is washed off during the early stages of the rainfall event, similar to how hosing a dirty car will remove the loose dirt. First flush diversion is when this more contaminated portion of water is directed away from your tank, before automatically switching back to your tank so you can collect the remaining rainfall.
The next step is to define how much water you should divert – to give you the optimal quality of water without diverting too much away from your tank.
")

Calculating your diversion needs
The volume of water we want to divert is dependent on your environmental factors and what you require from your system – so you’ll need to weigh up the quantity of water you can afford to discard versus the quality you require.
As the rainfall event starts, it washes off the bulk of the dirt and debris within the first few millimetres of rainfall. This is the water we want to discard – it’s the most polluted.
Then we want to start capturing the rest of the water. Most first flush diverters work automatically and can be configured to divert a certain volume of water.
First, consider if you deem your area to be a low, medium, or high level of pollution, based on your geographic location and what sort of flora or industry is around you.
A low pollution area is defined as a low-density housing area without overhanging trees, or any major transport corridors or industry. In this case, you only need to divert the first 0.25mm of rainfall, meaning if you have a 100m² catchment area, you’ll be diverting the first 25 L.
Next, if you’re in a medium-populated area with major roadways and in relative proximity to industry and flight paths, but not directly under them, you would be defined as being in a moderate pollution zone. In this case, you’ll divert the first 0.5mm of rainfall. So if we have the same roof of 100m² that means we’ll be diverting 50L.
Lastly, if you are much closer to industry, agriculture, or have lots of overhanging trees, you’ll be categorised as a high pollution zone, and will need to divert the first 1mm of rainfall or 100L for a 100m² roof.
There are lots of first flush solutions depending on how much you need to divert and where you’re going to put it. Some will require a small chamber to temporarily hold the first flush water before it is discarded, while others will automatically divert the water without the need for an intermediate storage vessel.
Whichever type you choose, diverting the first flush can significantly improve the quality of the rainwater you collect. It’s one of the most important components of any rain harvesting system.
STEP #6
Secure your
rainwater system
By securing the entry and exit points of your system, you can keep animals, insects, sunlight and dirty water out in order to reduce hidden activity and preserve your rainwater quality.
In the previous steps, you have put the steps in place to ensure great quality water gets to your tank. This critical step focuses on the tank itself, and the tools required to ensure your water is protected and stays clean and fit for purpose.
Unwelcome intruders such as animals, insects, sunlight, stormwater and groundwater, should be kept out as they can contaminate your rainwater supply and exacerbate harmful hidden activity in your tanks and pipes.
More specifically, you’ll need to secure the entry and exit points, as well as any other openings to keep potential contaminants out.
Protecting your tank inlet
At your inlet, the first port of call is to keep leaves, and pests from entering your tank. Tank screens are an effective tool that uses a fine mesh screen to provide another layer of filtration to keep contaminants out.
The less organic matter enters your tank – the better quality of your water. Keeping the mesh under 1mm is key in keeping mosquitoes out, however, you can use even finer mesh to eliminate even smaller hazards such as dust and silt from entering your tank.
Next, you’ll need to consider options to limit the chance of algae growing in your tank inlet. Algae need organic matter and sunlight to grow. While tank screens are effective in dealing with organic matter, a solar shield or tank cover helps block the light out and protect your supply. There are a variety of options that can either mount underneath the tank screen or can be placed on top of the cover
")

Securing your tank overflow and outlets
Once the inlet is secure, it’s time to shift focus to the overflow of your tank. The goal remains the same, to ensure the tank is secure from pests and debris.
Mosquito-proof screens have specifically been designed to keep out mosquitos and other pests. It’s crucial to have one mounted on your overflow pipe, whether it’s directly at the tank or further down the line where it can be easily accessed. Ensure you have the ability to access it so you can clean them periodically to prevent any build-up of biofilm or small debris that can eventually creep into your system.
When you’re setting the system up, you need to ensure that your overflow has the ability to handle the same flow rate of water as the pipes entering your tank. This means the overflow has to be the same size or greater than the inlet, so you’re not in a situation where there is more water coming into your tank than can get out. This means that the overflow will always flow effectively during a heavy rain event.
Safeguarding against backflow
If you’re connected to municipal stormwater, it is important to safeguard your tank from backflow which might occur in the stormwater system.
During a heavy rain even, if water is backed up in stormwater lines or in the street, it can flow back towards your tank and potentially contaminate your entire water supply.
To prevent this, it is recommended to install an air gap, which is a physical break in your tank overflow line so that it’s impossible for stormwater to backflow into your tank.

STEP #7
Decide on a pump or gravity fed system
Find the best way to draw water from your tank depending on what your end use is.
Now that your rainwater collection and storage systems are optimised, it’s time to shift focus to determine how the water is going to move through your system. The way you use your water, the design of your system, and the topography of your property will influence whether you use a gravity-fed system, use a pump, or a combination of both.
Gravity Fed System
Gravity-fed systems are suitable where you either have a lot of head height between the storage point and usage point, or in situations where you don’t require high pressure, such as topping up your pool or low-pressure irrigation. Provided you have enough head height differential, either of these situations are ideally suited to a gravity-fed system.


Pump system
The next option is using a pump. Pumps ensure you have the pressure you need all the time, and are less influenced by the layout of your system or property.
There are a few considerations when choosing a pump. As a primary focus, you need to understand how much water is going to be used and select the pump which has a suitable flow rate for your needs. Secondary to this, you need to ensure the pump has the right capabilities based on the height you need to pump water from, and what sort of tank you’re pulling water from.
As there are many different types of pumps with different power and installation requirements, it’s important to talk to a pump specialist about your needs. If you show them your system design, and discuss your needs, they will be able to assist you with choosing the correct model, and the best way to install it so you can make your system as efficient as possible.
Combination
Another popular setup is to use a pump to transfer water up to a header tank. From there, it essentially becomes a gravity-fed system that can be easily directed for continued use without the pump as there is enough pressure built up. In this scenario, you can conserve power and choose when it is convenient for you to pump water up to the tank, for example when power is available or cheaper

Each scenario has its place, just take stock of your set-up and requirements to decide which system will suit you and your property the best.
STEP #8
Manage standing water
By looking after the water sitting in your tank and pipework, you’re ensured great quality water.
Collecting high-quality water is half the battle. However, if you want your rainwater supply to remain fit-for-purpose, you also need to maintain the quality of the water you’ve harvested. Managing your standing water within your system to prevent and limit hidden activity is central to achieving this.
Once rainwater is captured in the system, there are two areas to focus on to ensure you can maintain a high quality – the water inside the tank itself, as well as any water sitting in any pipework throughout the system.
The three main goals for this step are to prevent sediment resuspension, reduce the opportunity for algae growth, and prevent the opportunity for anaerobic fermentation to occur within pipework
Prevent Sediment Resuspension
Over time, it’s natural for a layer of sediment to build up at the base of the tank. The speed at which the sediment accumulates is controlled by the level of filtration that is installed beforehand with tools such as rain heads or first flush diverters.
That said, having sediment in the base of the tank is not necessarily a bad thing as it typically will stay put on the base of the tank unless it is stirred up and resuspended. It is important to reduce the chance of this happening so it is not drawn into your water supply. The first step to preventing the resuspension of this sediment is to create a small buffer on the base of the tank, so that even when your water level is low, the sediment is not stirred up. The easiest way to create the buffer is to ensure that the outlet where you draw the water off is at least 100mm (4 inches) from the base of the tank. This layer of water helps to dissipate the load of any incoming water. Of course, when the tank is partially or completely full this is not an issue since there is a much larger buffer.
Another way to control the inflow of water into your tank is with a calmed inlet. It will change the direction of the water as it enters the tank so that it does not fall directly on the sediment layer – reducing the chance of it being stirred up even when the water level is low.

")
Prevent algae growth
Algae needs sunlight and nutrients to grow (since it photosynthesizes like any other plant). Tank screens and rain heads will reduce the nutrient load in the tank, but you will need a solar shield to block out the sunlight. Different sorts of solar shields block out light using different methods. Some even have integrated fins to help to disperse the flow of water into your tank to further reduce the chance of sediment resuspension.
Drain Charged Systems
Another area in your rainwater system where it’s important to maintain your water quality is in your pipework. This is especially important in the case of wet or charged rainwater systems as there is more likely to be water standing in the pipes between rainfall events.
If this is not carefully monitored, your water can become poor tasting or malodourous of anaerobic fermentation. This process essentially means your water can go “off” as a result of low levels of oxygenation found within the pipework, and its interaction with organic matter.
Just like in your tank, it’s normally for a small amount of organic matter to accumulate in this pipework. However, as mentioned in Step 4, it’s important to minimise this, by installing rain heads prior to the system.
An easy way to reduce the chance of stagnation of this water is to periodically drain your charged lines. It is a simple and effective way to prevent standing water from contaminating the rainwater in your tank. Depending on your location and setup – draining the lines after each rainfall event might be required, but often every few weeks or months will suffice – it depends on the debris load, the quality of water you’re chasing, and the volume of water you are able to sacrifice.
You can choose to do this with a manual valve, or with an automatic version with programmed intervals. Whatever option you choose, the best practice is to install this device at the lowest part of your charged line to ensure that you’re draining the full body of water.
Some or all of the elements we’ve described might apply to your system. Adopt the practices which will suit your system, and it will ensure your rainwater remains at its best.
STEP #9
Final stage rainwater filtration
Reduce sediment, colour, and odour from rainwater before use.
In this step, it’s important to consider how you are going to apply your rainwater to its end use, and if any further filtration is required to maximise your results.
There are three main areas of use that you must consider to determine the quality you require:
Irrigation and garden use
If you are primarily using your rainwater for irrigation and garden use, then you will not likely require any further filtration as your stored water will already be of suitable quality if you’ve taken the appropriate steps to this point.
The only other consideration would be from a maintenance perspective as some irrigation systems might be susceptible to sediment in the rainwater.
In this case, installing a sediment filter will reduce any maintenance requirements and ensure your irrigation system performs better for longer. The components of your irrigation system should specify the size to filter down to, but it is recommended to start with at least 100 microns, if not a little smaller.

Internal appliances and toilets
When using the water for internal appliances and toilets, you will need to be mindful of the flora you have around your property and the subsequent impact this can have on the water in your system. At this level of required water quality, you want to remove sediment, while minimising tannins, colours, and odours to prevent any staining to your appliances.
The most effective way to do this is with a dual-stage filtration system. The first stage removes sediment and small particles, and then the second stage filters carbon filter which specifically improves colour and odour.
Showering and drinking
The next stage of quality is required when using the rainwater for all purposes, including showering and drinking. In this scenario, the filter system needs to deliver the cleanest water possible.
While a dual-stage system may suffice, a triple-stage system allows you to step down the filtration level more gradually. This progressive approach will ensure each of the filters are working efficiently as part of a team, and that no filter is being overloaded. This allows your system to continue to perform more effectively over a longer period of time.

As you can see, the end use for your rainwater plays a large role in how your system is set up, and the filtration that is required is to achieve the desired result. The more diverse your needs, the more filtration is required to ensure your system is set up for success.
STEP #10
Optimise Your Overflow
Optimise your overflow to ensure your tank is always performing at its best, even during high rainfall events.
The overflow of your tank can often be an afterthought when setting up your system. However, it’s important to select your components and configure them correctly to ensure that the overflow doesn’t restrict the overall performance of your rainwater collection efforts
The overflow is important to consider as most tanks are not designed to be filled completely or become pressurised. This means that when your tank is full, you need measures in place to allow any extra water to escape safely, especially in heavy rainfall events.
The first step in the optimal overflow function is to ensure the overflow is the same size or greater than the inlet. This ensures that when the tank becomes full in a heavy rainfall event, water can overflow from your tank as designed rather than spill from the inlet.
Additionally, your overflow should be equipped with a mosquito-proof screen to prevent pests from entering the tank. The size and type of the mesh screen will influence how often you need to maintain the unit. The bigger the screen, the less chance you have of any flow restrictions at your overflow. To keep functioning properly, you must be able to remove the screen for periodic maintenance to remove any biofilm and smaller debris.
As you can see, overflows are not to be overlooked. With just a small number of adjustments, an optimised overflow process can have the rest of your system performing at a level that will help you capture more clean water while reducing any potential wastage.
STEP #11
Monitor your water level
Record your usage to optimise your rainwater use.
Use data to track your usage and requirements
Being conscious about our water usage and conserving where we can is important whether you’re on a centralised, municipal water supply or your own rainwater system.
The first step to understanding your usage is to track and monitor it. If you’re on a municipal water supply, your water bills inform you of how much water you use.
However, if you are solely using your rainwater system you will need to install a gauge. In this case, it’s even more important to keep a close eye on your water levels so you don’t get caught short in times of need.
Fortunately, there are a variety of options available ranging from basic analogue gauges, right through to models which can connect to your mobile device, phone, or computer, enabling access to your levels in real-time from anywhere. This data will not only help you track your current levels, but analyse trends in your levels and usage over time, enabling you to forward plan, tweak your set-up, and adjust your habits when necessary.
Choose the right gauge for your system
Depending on the individual elements of your rainwater system, there is a range of tank gauges that might be appropriate for your needs.
Smart gauges
Smart gauges are designed to track your water usage day to day as well as spot seasonal trends throughout the year. They can easily connect to any of your devices so you can automatically track all your historical data, and give you a strong foundation of data to make decisions from moving forward.


Analogue gauges
If you prefer mechanical or analogue tools, there are many gauges to choose from that will help you identify the current water level accurately. From here, you can manually record data to determine trends.
Regardless of which type you choose, having a gauge will help you stay on top of your water usage to help you get the best out of your rain harvesting system.
STEP #12
Care for your system
Inspect your system intermittently to keep it running at its best.
Over the course of these 12 steps, you’ve learnt how to prepare and plan to create the best rain harvesting system for your needs, but even the best rainwater collection system requires some maintenance.
Once you’ve set up your system, you’ll need to monitor it closely after the first rainfall so you can understand how it all looks after having water run through each part of the system.
At the most basic level, you need to ensure all the elements are connected properly and the water is able to flow through the system without leaking.
It’s important to understand that different elements of your system will require inspection at different intervals.

Check mesh for leaves and debris
The first key areas you want to inspect are any areas that have mesh, as these are the places where leaves and debris can accumulate over time.
For rain heads, check the screens and brush off any leaves. If you have a bucket-style or covered rain head, these will require more attention as leaves cannot shed from the mesh naturally during a rainfall event.
The same goes for other areas with mesh – inspect tank screens, overflows and air gaps and backwash them or brush them if necessary.
Clean out your first flush and valves
When it comes to your first flush system, you’ll want to check the outlet for any accumulation of debris. Open the unit up to check the internal strainer, pull it out, and give it a backwash. Make a note of how much debris has gathered so you can gauge how often you’ll need to do this in the future.
It’s a good idea to also check the release valve at this point to ensure there’s no obstruction. If you’ve got a wet system with an automatic wet-dry valve, it will have the same sort of strainer as most first flush devices, so inspect and clean it accordingly. If you don’t have an automatic valve, you’ll want to periodically drain your charged lines.
From here, make your way into checking over the final stage filtration system. As this is the last element before end use, it should be checked with more regularity and switched over every six months.

As with anything in life, building good habits will ensure that it is easy to keep your rain harvesting system performing at its best. When your system is built with the right products, it will make it easier to maintain. A few minutes invested at regular intervals will go a long way to keep your system running smoothly.
While this is individual to each property, it is recommended to do periodic checks more regularly in the initial months after your installing your system, and then from there you can adapt based on your findings.
System Design Examples
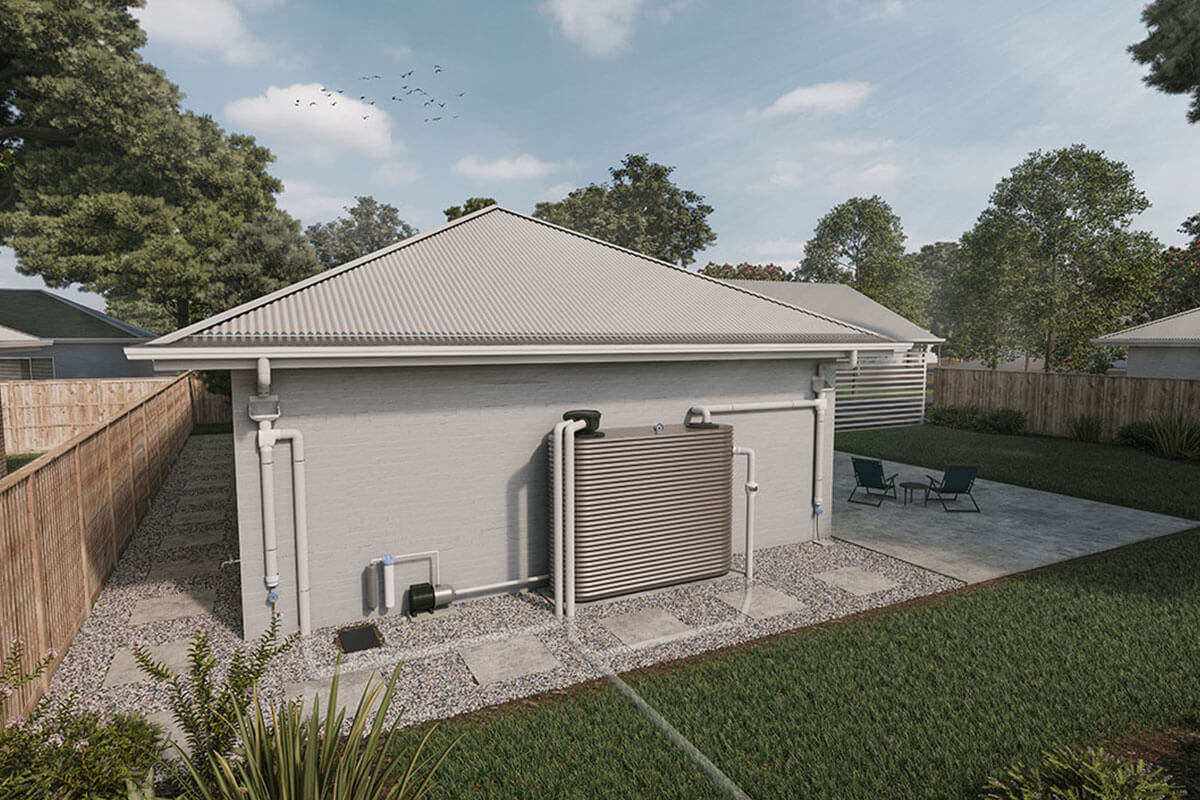
Residential - Combination Wet & Dry System with Above Ground Slimline Tank
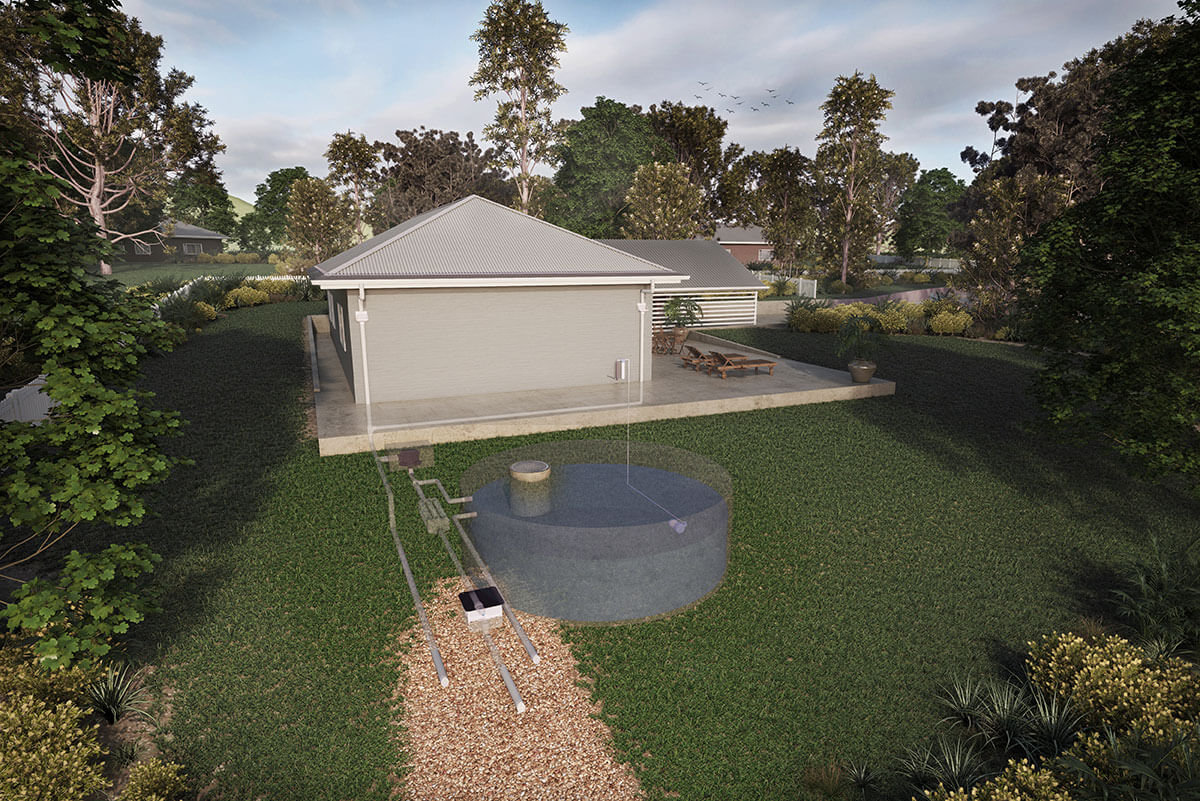
Residential - Wet System with In-Ground Concrete Tank
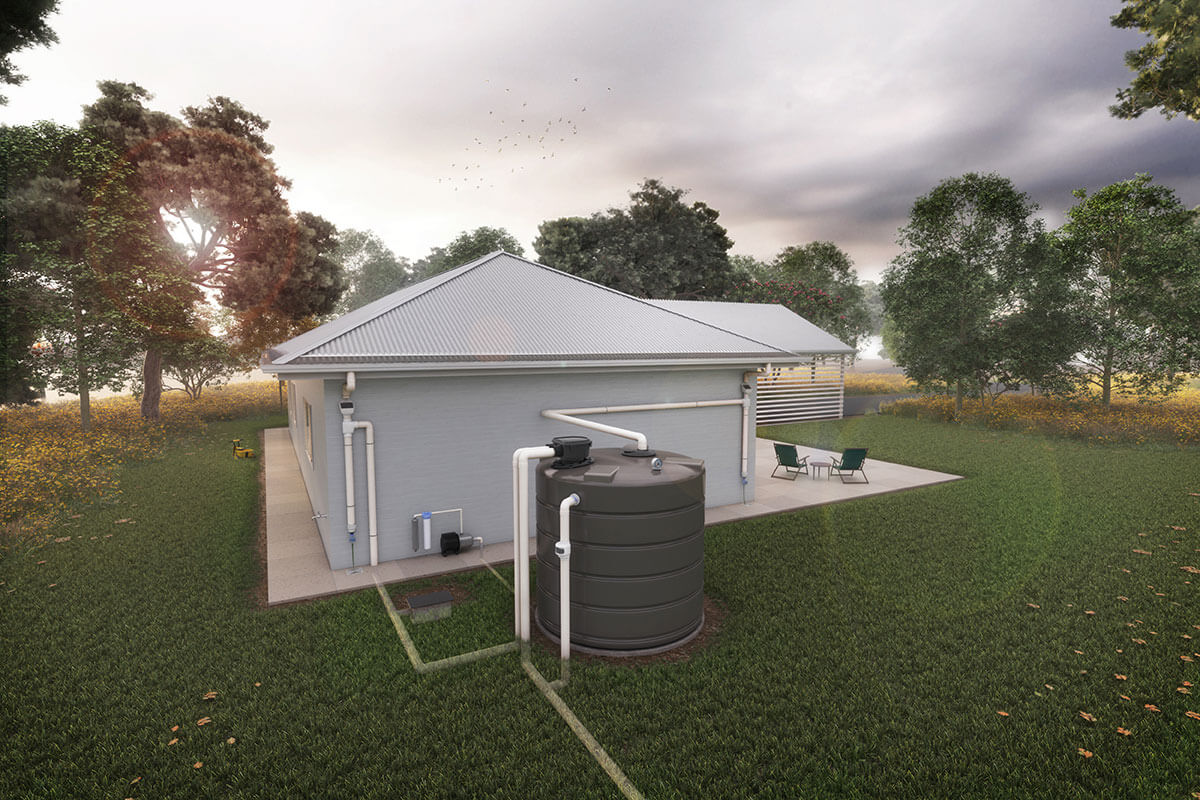
Residential - Combination Wet & Dry System with Above Ground Poly Tank
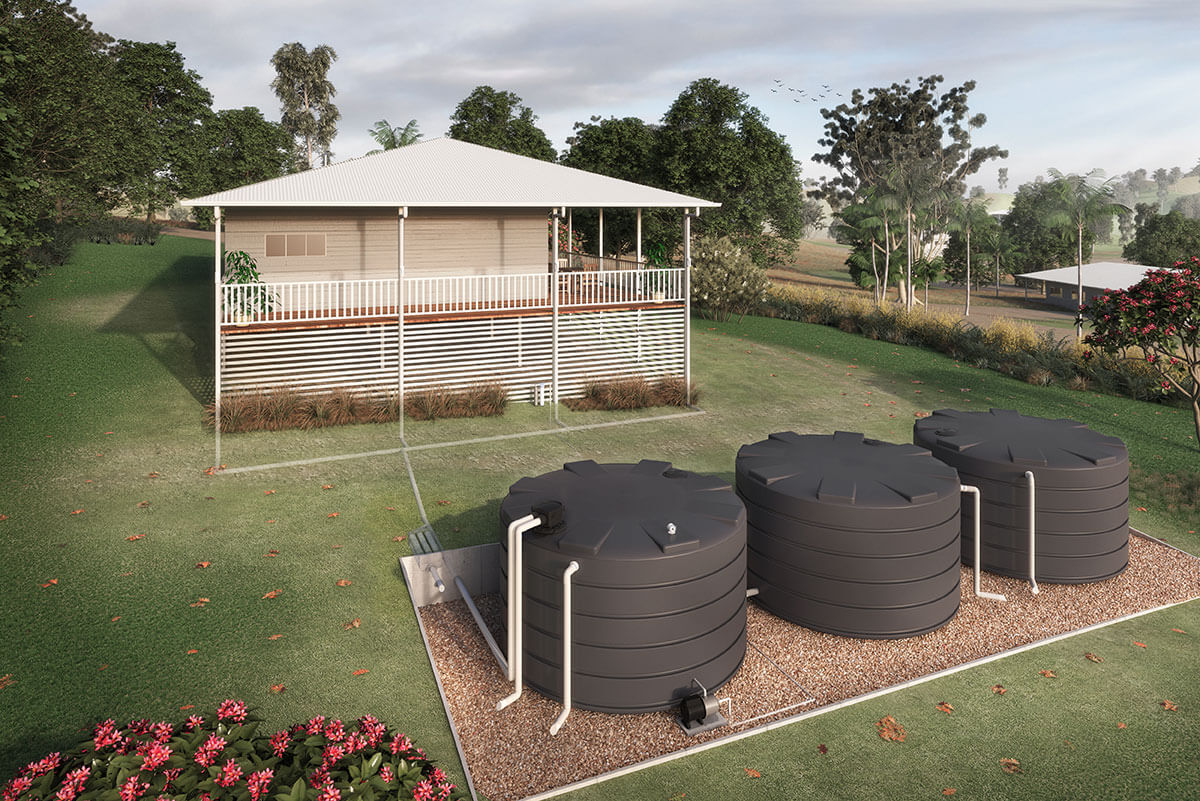
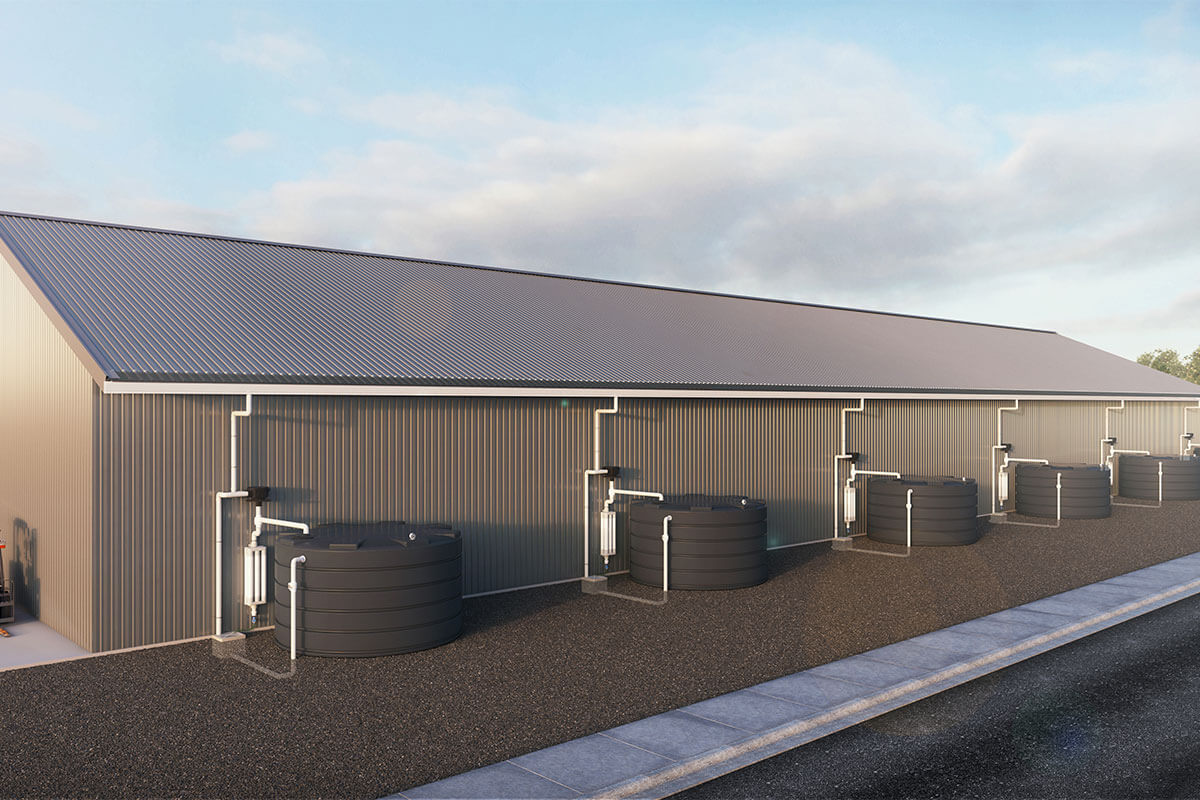
Acreage - Wet System with Above Ground Poly Tanks
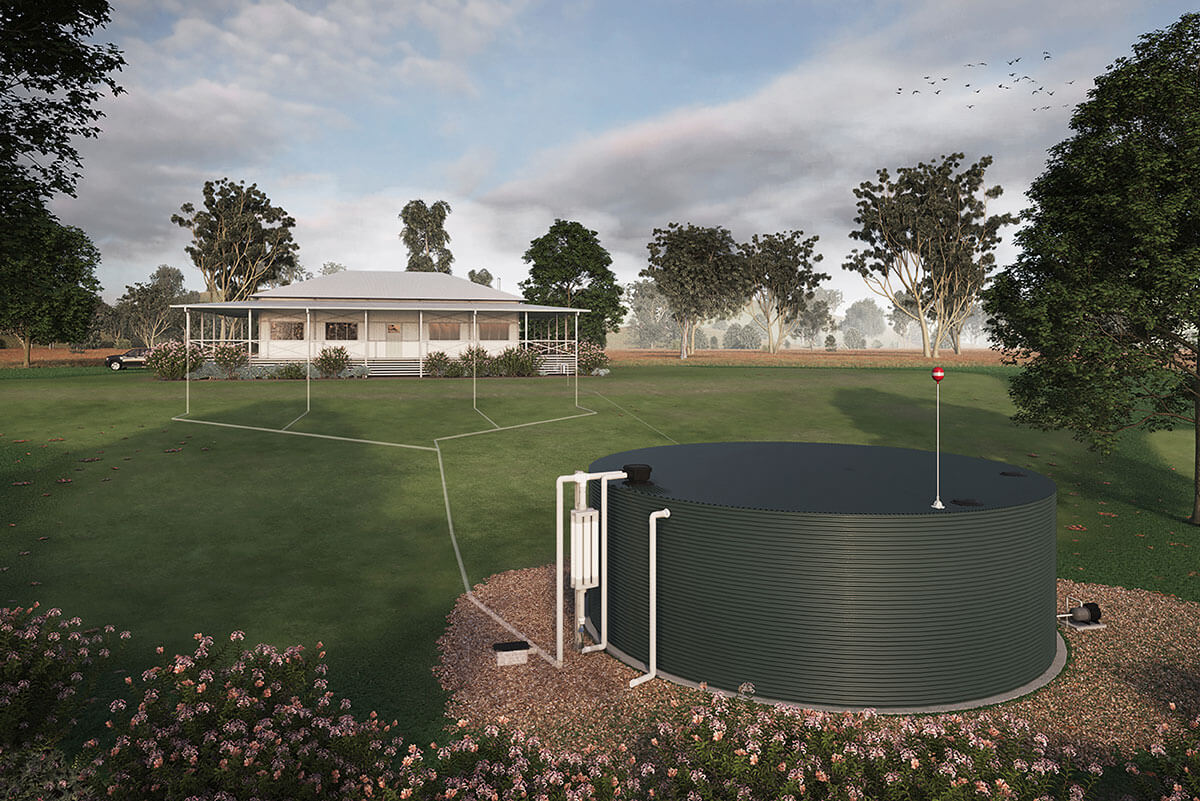
Rural - Wet System with Above Ground Corrugated Tank
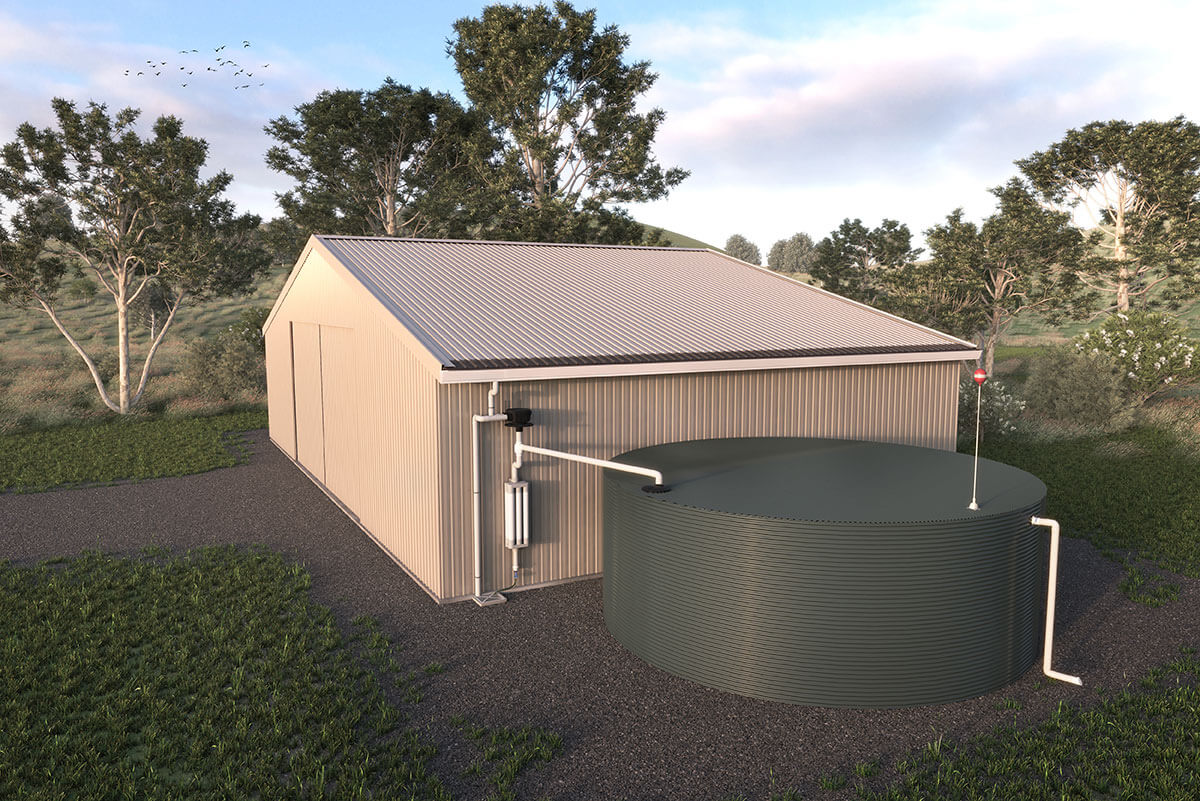
Shed - Dry System with Above Ground Corrugated Tank
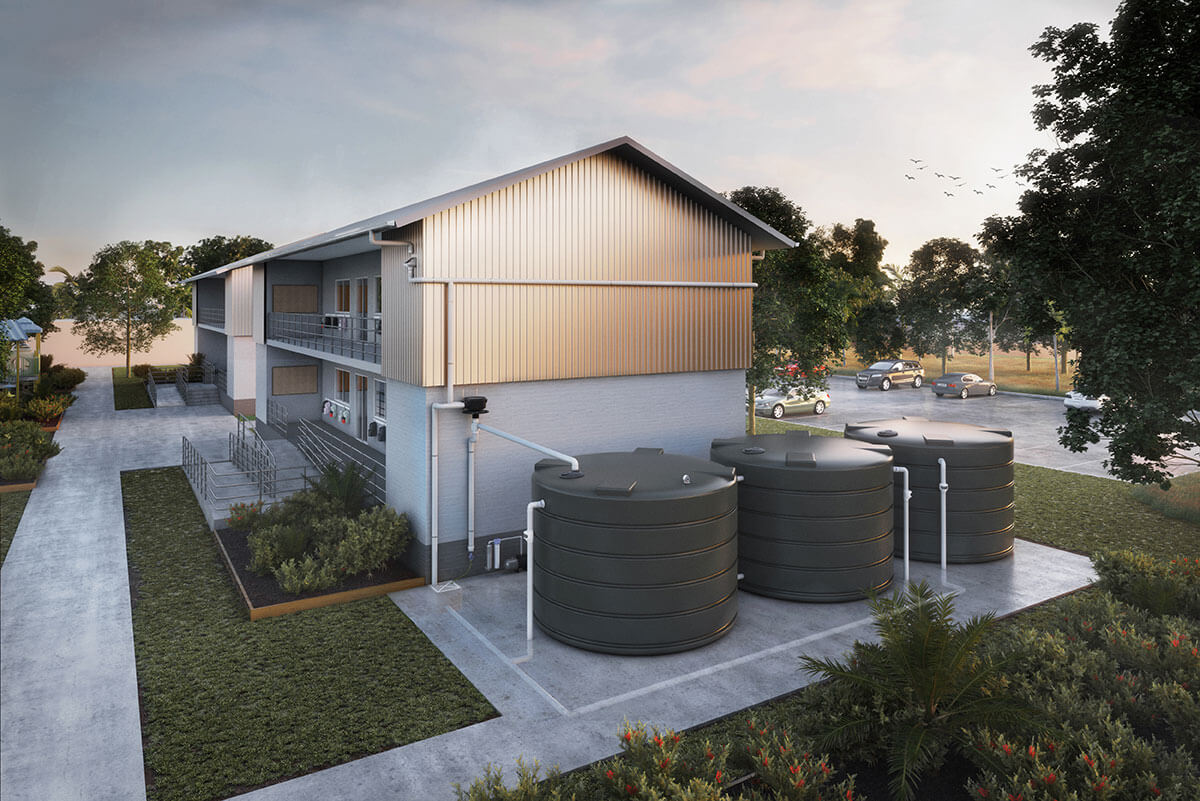
School - Dry System with Above Ground Poly Tanks