वर्षा संचयन के 12 चरण
हालाँकि, आपको आवश्यक पानी की मात्रा और गुणवत्ता प्रदान करने के लिए अकेले इस पर भरोसा नहीं किया जा सकता है।
इसके बजाय, अपने वर्षा जल संचयन की सफलता सुनिश्चित करने के लिए 12 चरणों का पालन करें। यह दृष्टिकोण 25 से अधिक वर्षों के ज्ञान और अनुभव से बनाया गया है, जो वर्षा संचयन के शिल्प के प्रति समर्पण और कठोर वातावरण में प्रक्रिया का कठोरता से परीक्षण करने के लिए विकसित किया गया है।
चरण #1
अपनी वर्षा जल की जरूरतों को समझें
जब रेन हार्वेस्टिंग की बात आती है, तो अधिक मापने योग्य लक्ष्य निर्धारित करते समय हम दो सक्रिय शब्दों का उपयोग करते हैं - मात्रा और गुणवत्ता।
आप अपने वर्षा जल के उपयोग की योजना कैसे बनाते हैं और उस उपयोग के लिए आपको कितनी आवश्यकता है, यह एक प्रभावी वर्षा जल संचयन प्रणाली का निर्माण करते समय आपके निर्णय लेने की आधारशिला है।

मैं कितना इकट्ठा कर सकता हूं?
चूंकि आप वर्षा जल एकत्र कर रहे हैं, इसलिए यह समझना अनिवार्य है कि आपके स्थानीय क्षेत्र की मौसमीता और वर्ष भर में कितनी वर्षा में उतार-चढ़ाव होता है। औसत वर्षा डेटा आपकी स्थानीय परिषद या मौसम विज्ञान ब्यूरो के माध्यम से उपलब्ध है। इस जानकारी के साथ, आप यह सुनिश्चित करने के लिए अपनी पानी की स्थिति का अनुमान लगाने में सक्षम होंगे कि आप इसके बिना पकड़े नहीं जाते।
यहां से, आपको यह स्थापित करने की आवश्यकता है कि आप वास्तव में इन स्थितियों से कितना पानी एकत्र कर सकते हैं।
यह आपकी छत के आकार पर निर्भर करता है, और यह आपके टैंक को कैसे निर्देशित किया जा रहा है। सामान्य नियम के रूप में, प्रत्येक 1 मिलीमीटर वर्षा के लिए, आप संग्रहण क्षेत्र के प्रति वर्ग मीटर में 1 लीटर पानी एकत्र करेंगे। उदाहरण के लिए, यदि एक महीने में 100 मिमी बारिश होती है, तो आप संभावित रूप से 130m² की छत से 13,000L पर कब्जा कर सकते हैं।
इसके बाद, आपको यह आकलन करने की आवश्यकता होगी कि क्या यह आपके पानी के उपयोग के आधार पर आपकी आवश्यकताओं के लिए पर्याप्त है। यदि नहीं, तो हमें कमी को पूरा करने के लिए संग्रहण क्षेत्र में वृद्धि करने की आवश्यकता है। यदि आप अनिश्चित हैं, तो हमारा मास बैलेंस टूल आपकी गणना में मदद कर सकता है।
पानी पर कब्जा करने की आपकी क्षमता भी पानी को स्टोर करने की आपकी क्षमता पर निर्भर करती है, जिसे हम चरण 2 में अधिक विस्तार से संबोधित करेंगे।
आप अपने वर्षा जल का उपयोग किस लिए करने जा रहे हैं, और आपको कितनी आवश्यकता है?
विशिष्ट बहुत बढ़िया है। आप अपने वर्षा जल के इच्छित उपयोग पर जितने स्पष्ट होंगे, आपकी वर्षा संचयन प्रणाली उतनी ही अधिक कुशल हो सकती है। यह समझना कि आप पानी का उपयोग किस लिए करने जा रहे हैं, गुणवत्ता की आवश्यकताओं और आपको कितने पानी की आवश्यकता है, यह सूचित करने में मदद मिलेगी।
यह निर्धारित करने के लिए कि आपको कितनी जरूरत है, बस अपने हाल के पानी के बिल की जांच करके देखें कि आप कितना उपयोग करते हैं। वैकल्पिक रूप से, आप हमारे मास बैलेंस टूल का उपयोग करके अपने पानी के उपयोग का एक स्नैपशॉट प्राप्त कर सकते हैं।
टूल गाइड आपके पानी के अनुप्रयोगों का आकलन करते हैं और आपको कितना पानी उपयोग करने की आवश्यकता हो सकती है। यह स्थान और मौसम को संबोधित करता है ताकि आप यह निर्धारित कर सकें कि पूरे वर्ष आपके पानी का संतुलन क्या है, यह सुनिश्चित करने के लिए कि आप कम नहीं पकड़े गए हैं।


आपको किस गुणवत्ता के पानी की आवश्यकता है?
यदि आप सिंचाई और अन्य बाहरी उद्देश्यों के लिए वर्षा जल का उपयोग कर रहे हैं, तो आपको इसे मध्यम स्तर तक लाने के लिए केवल न्यूनतम मात्रा में काम करने की आवश्यकता होगी। न्यूनतम निस्पंदन आवश्यक है क्योंकि पंपों की सुरक्षा सुनिश्चित करने के लिए कुंजी हमारे बड़े मलबे को रख रही है और रुकावट के जोखिम के बिना सिंचाई उपकरण सुचारू रूप से काम कर सकते हैं।
वाशिंग मशीन और शौचालय जैसे आंतरिक उपकरणों के उपयोग के लिए - आपको पानी के रंग और गंध को कम करने के लिए उच्च स्तर की पानी की गुणवत्ता प्राप्त करने की आवश्यकता होगी।
यदि आप सभी उद्देश्यों, विशेष रूप से पीने के लिए वर्षा जल का उपयोग करने की योजना बना रहे हैं, तो सिस्टम को उपयोग करने से पहले किसी भी शेष तलछट को हटाकर उच्चतम गुणवत्ता और सर्वोत्तम स्वाद वाले पानी को प्राप्त करने के लिए डिज़ाइन करने की आवश्यकता होगी।
अपने सिस्टम की योजना बनाते समय, अंतिम लक्ष्य को ध्यान में रखकर शुरुआत करना महत्वपूर्ण है। अपने पर्यावरण को समझकर, आप बेहतर ढंग से समझ पाएंगे कि आपकी संपत्ति के लिए क्या संभव है। वहां से, आप किसी भी समय आपके लिए उपलब्ध पानी की मात्रा और गुणवत्ता को अधिकतम करने के लिए जानबूझकर अपनी उपयोग आवश्यकताओं के आसपास प्रणाली का निर्माण कर सकते हैं। वह मन की शांति है।
चरण #2
अपने वर्षा जल को स्टोर करें
अपनी संपत्ति के लिए सही चुनाव करें।
अपनी आवश्यकताओं के लिए एक उपयुक्त भंडारण पोत चुनें।
यह दोहराना महत्वपूर्ण है कि पानी को पकड़ने की आपकी क्षमता भी इसे संग्रहीत करने की आपकी क्षमता पर निर्भर है, यह वह जगह है जहां आपको अपनी संपत्ति के मेकअप और भंडारण जहाजों को स्वयं देखने की आवश्यकता है।
यदि आप अभी शुरुआत कर रहे हैं, या केवल थोड़ी मात्रा में पानी की आवश्यकता है, तो एक रेन बैरल या छोटा टैंक काम पूरा कर देगा।
हालांकि, यदि अधिक मात्रा में पानी की आवश्यकता है, तो हमारे पास कई विकल्प हैं जो आपके लक्ष्यों को प्राप्त करने में आपकी सहायता कर सकते हैं।
सबसे अच्छा भंडारण पोत चुनना
आपकी संपत्ति की सुंदरता और आपके पास उपलब्ध स्थान के आधार पर, आप जमीन के ऊपर टैंक या जमीन के अंदर टैंक का विकल्प चुन सकते हैं।
जमीन के अंदर के टैंक जमीनी स्तर पर जगह बचाने में मदद कर सकते हैं, और क्योंकि वे घर की तुलना में बहुत नीचे बैठते हैं, इससे गटर से टैंक इनलेट तक अच्छी मात्रा में गिरना बहुत आसान हो सकता है। यह एक बहुत बड़े वॉल्यूम टैंक के लिए अनुमति दे सकता है, जहां एक उपरोक्त जमीन टैंक घर की ऊंचाई से सीमित हो सकता है।
")

जब आकार की बात आती है, तो अंतरिक्ष पर विचार करना महत्वपूर्ण है। यदि आपकी संपत्ति में सीमित स्थान और तंग विनिर्देश हैं, तो आप एक स्लिमलाइन टैंक का चयन करना पसंद कर सकते हैं जो आपके घर के किनारे को गले लगा सके। हालाँकि, यदि आपके पास अधिक स्थान और लचीलापन है - तो आप एक क्लासिक गोल टैंक का विकल्प चुन सकते हैं, और अपनी भंडारण क्षमता बढ़ा सकते हैं।
आपकी पसंद जो भी हो, यह ध्यान रखना महत्वपूर्ण है कि यदि आपकी आवश्यकताएं बदलती हैं तो आप अपनी मात्रा बढ़ाने के लिए कई छोटे टैंकों को जोड़ सकते हैं। यह आपके स्थान के आकार और आकार पर निर्भर करता है।
पूरे सिस्टम पर विचार करें।
अपनी छत और डाउनपाइप को अपने टैंक से जोड़ते समय, दो मुख्य प्रणालियाँ होती हैं - सूखी और गीली।

शुष्क प्रणाली
एक सूखी प्रणाली पानी को छत से सीधे टैंक में प्रवाहित करने में सक्षम बनाती है। पाइप में ऊपर की ओर कोई भाग नहीं है इसलिए पानी कभी भी पाइप में जमा नहीं होता है, क्योंकि हर बार बारिश होने पर वे पूरी तरह से निकल जाते हैं।
ड्राई सिस्टम अक्सर मौजूदा इमारतों के साथ स्थापित करने के लिए सरल होते हैं और कुछ पाइपों को फिर से रूट करके प्राप्त किया जा सकता है, जिसमें न्यूनतम प्लंबिंग या ग्राउंडवर्क की आवश्यकता होती है। हालाँकि, आपके पास छत की शैली के आधार पर, जैसे कि गैबल, छत के एक बड़े क्षेत्र को टैंक से जोड़ना मुश्किल हो सकता है।
इस मामले में, यदि आपको अपने संग्रह क्षेत्र को बढ़ाने की आवश्यकता है, तो आपको अधिक जल संग्रहण के लिए आपको स्थापित करने के लिए एक गीली प्रणाली पर विचार करने की आवश्यकता हो सकती है।
गीला सिस्टम
वेट सिस्टम (या चार्ज सिस्टम) आपको अपने भवन के अधिक से अधिक हिस्से को टैंक से जोड़ने में सक्षम बनाता है, जिससे पानी का कब्जा अधिकतम होता है।
यह इमारत से जमीन में आने वाले पाइपों को जोड़कर हासिल किया जाता है, और फिर आपके टैंक तक वापस आ जाता है। इन्हें नई साइट पर स्थापित करना अक्सर आसान होता है, क्योंकि टैंक में वापस जाने के लिए पाइपों को भूमिगत रूट करने की आवश्यकता होती है।
")
एक बार जब आप अपनी संपत्ति के लिए उपयुक्त प्रणाली और भंडारण पोत का निर्धारण कर लेते हैं, तो सर्वोत्तम गुणवत्ता वाले वर्षा जल प्राप्त करने के लिए अपनी छत या संग्रह क्षेत्र का आकलन करने और तैयार करने का समय आ गया है।
चरण #3
अपने वर्षा जल संग्रहण क्षेत्र का आकलन करें
अपनी संपत्ति को वर्षा जल संग्रहण के लिए तैयार करने के लिए अपनी छत, गटर और आसपास के वातावरण का ऑडिट करें।
अपने वर्षा जल संग्रहण बिंदुओं का आकलन करते समय, विचार करने के लिए तीन मुख्य क्षेत्र हैं - छत, नाली और आसपास का वातावरण।
छत
यह कदम आपको मुख्य संग्रह बिंदु से सफलता के लिए स्थापित करने के बारे में है। छत आपकी वर्षा जल प्रणाली में एक अभिन्न भूमिका निभाती है, क्योंकि यह पहला क्षेत्र है जिसके संपर्क में पानी आता है।
आपको विभिन्न प्रकार के प्रदूषकों के जोखिम का आकलन करने की आवश्यकता है जो आपके सिस्टम में धुल सकते हैं।
जिन मुख्य कारकों पर आपको ध्यान देने की आवश्यकता है वे हैं;
- लीड पेंट और फ्लैशिंग
- फ्लेकिंग या खराब सामग्री
- टूटी हुई टाइलें
यदि इनमें से कोई भी आपके प्रारंभिक निरीक्षण के दौरान पाया जाता है, तो यह अनुशंसा की जाती है कि आप किसी भी संग्रह के साथ आगे बढ़ने से पहले उन्हें बदल दें या ठीक कर दें।


गटर
मूल्यांकन के लिए अगला क्षेत्र गटर है। छत के समान, आपको किसी भी परतदार सामग्री या जंग के संकेतों की तलाश में रहने की आवश्यकता है जो आपके सिस्टम में प्रवेश करने वाले दूषित पदार्थों को जन्म दे सकते हैं।
इसके अलावा, आपको यह सुनिश्चित करने की आवश्यकता है कि पानी को पूल करने के लिए कोई अवसर नहीं है, जो जंग का कारण बन सकता है और मच्छरों के प्रजनन के लिए एक वातावरण प्रदान कर सकता है।
वाटर पूलिंग का प्राथमिक कारण एक क्षतिग्रस्त गटर या एक है जहां डाउनपाइप में पर्याप्त जल प्रवाह की अनुमति देने के लिए गिरावट पर्याप्त नहीं है। स्थिति का आकलन करने के लिए एक नली के साथ गटर में पानी का छिड़काव करें और जहां आवश्यक हो वहां गटर को समायोजित या बदलें।
पर्यावरण
एक बार छत और गटर का आकलन और सफाई हो जाने के बाद, आसपास के पर्यावरणीय कारकों को देखना महत्वपूर्ण है जो आपके वर्षा जल की गुणवत्ता और आपके सिस्टम की रणनीति को प्रभावित कर सकते हैं।
किसी भी काई या भारी जैविक निर्माण के लिए अपनी छत का निरीक्षण करें। यदि पाया जाता है, तो छत को पेशेवर रूप से साफ करने की सिफारिश की जाती है।
यदि आपके ऊपर लटके हुए पेड़ हैं, तो पत्ती कूड़े को आपकी छत पर गिरने से रोकने के लिए उन्हें वापस ट्रिम करना महत्वपूर्ण है। वैकल्पिक रूप से, आप जितना संभव हो पत्ती भार को कम करने के लिए गटर मेश स्थापित कर सकते हैं, साथ ही आसपास के गुणों या पेड़ों से किसी भी हवा से उड़ने वाली पत्तियों को अपने गटर में जमा और टूटने से रोक सकते हैं। यह समाधान नहीं होने पर गटर क्षति, क्षरण और रुकावट पैदा कर सकता है। छत पर पत्तियों की मात्रा कम करना पूरे सिस्टम में मलबे के भार को कम करने में एक बड़ी भूमिका निभाता है, जिसका अर्थ है बेहतर पानी और आपके सिस्टम का कम रखरखाव।
गटर मेश आपके गटर सिस्टम और रूफ कैविटी में प्रवेश करने से कीटों और अंगारों को रोकने में भी सहायक है, और आपकी संपत्ति की सुरक्षा करता है।

एक बार संग्रह क्षेत्र को वर्षा जल को पकड़ने के लिए उपयुक्त माना जाता है, तो आप अपने सिस्टम को डिजाइन करने के साथ आगे बढ़ सकते हैं।
चरण #4
अपने वर्षा जल को साफ करें:
फिल्टर पत्ते और मलबे
अपने वर्षा जल तंत्र से पत्तियों और मलबे को बाहर रखें।
यह 12 चरणों का एक महत्वपूर्ण हिस्सा है, जब आप फिल्टर स्थापित करना और शुरू करना शुरू करते हैं जो पानी की गुणवत्ता में उत्तरोत्तर सुधार करते हैं क्योंकि यह आपके टैंक तक जाता है।
पत्तियां और मलबा आपके वर्षा जल की गुणवत्ता और मात्रा को खतरे में डाल सकता है। वास्तव में, वे कई वर्षा जल संग्रह मुद्दों का मूल कारण हैं, वर्षा जल प्रदूषण से आपके टैंक में बाधित जल प्रवाह, और बीच में लगभग सब कुछ।
आपके पाइपों में कार्बनिक पदार्थों का संचय आपके पानी की गुणवत्ता को नकारात्मक रूप से प्रभावित करेगा। जैसे ही पत्तियां टूटती हैं, वे अवायवीय किण्वन की प्रक्रिया के माध्यम से पानी को "बंद" करना शुरू कर देंगे - जिससे सिस्टम में रोगाणु इस कार्बनिक पत्ती पदार्थ का उपभोग करना शुरू कर सकते हैं, जो पानी के रंग, गंध और स्वाद को प्रभावित कर सकता है। .
इसके बाहर, पत्तियां पाइपों को बंद करने में योगदान कर सकती हैं जो आपको पानी पर कब्जा करने से रोकेगी, और स्थानीय क्षति या बाढ़ का कारण बन सकती है।
इस वजह से, अपने रेन हार्वेस्टिंग सिस्टम से बाहर रखने के लिए पत्तियों और मलबे को छानना महत्वपूर्ण है। आपके रेन हार्वेस्टिंग सिस्टम में सुरक्षा की परतें प्रदान करने के लिए किसी भी संभावित पत्ती और मलबे के प्रवेश बिंदु पर फ़िल्टरिंग का उपयोग किया जाना चाहिए।
सबसे आसान उपाय यह है कि प्रत्येक डाउनपाइप पर मच्छर रोधी जाल के साथ रेन हेड स्थापित किया जाए - यह मच्छरों के प्रवेश को रोकने के अतिरिक्त लाभ के साथ पत्तियों को सिस्टम में प्रवेश करने से रोकेगा।
रेन हेड्स
जब बड़े मलबे को छानने की बात आती है तो रेन हेड्स कॉल का आपका पहला पोर्ट होता है। वे आपकी पसंद की प्रणाली में फिट होने के लिए सभी आकारों और आकारों में आते हैं। एंगल्ड स्क्रीन वाली शैलियाँ हैं जो पत्तियों को बाहर निकालने और आवश्यक रखरखाव की मात्रा को कम करने के लिए डिज़ाइन की गई हैं। वैकल्पिक रूप से, बकेट-स्टाइल रेन हेड्स हैं जो सुनिश्चित करते हैं कि आप पानी की हर बूंद को पकड़ सकते हैं, लेकिन यह सुनिश्चित करने के लिए कुछ रखरखाव की आवश्यकता होती है कि वे मलबे और अतिप्रवाह से नहीं भरते हैं।
रेन हेड्स सभी प्रणालियों के लिए महत्वपूर्ण हैं। वे पाइप में कार्बनिक पदार्थों के निर्माण को रोकने के लिए गीले सिस्टम और चार्ज लाइनों पर विशेष रूप से महत्वपूर्ण हैं, और मच्छरों को आपके पाइपवर्क में प्रवेश करने से रोकते हैं।


टैंक टॉप स्क्रीन और फिल्टर
अपने डाउनपाइप पर रेन हेड के विकल्प के रूप में, आप अपने टैंक में केवल पत्तियों को फ़िल्टर करना चुन सकते हैं। हो सकता है कि आपके गटर और आपके टैंक टॉप के बीच अधिक ऊँचाई न हो, और यह रेन हेड को स्थापित करना मुश्किल बना सकता है।
यदि ऐसा है, तो एक टैंक स्क्रीन या अन्य टैंक टॉप फ़िल्टर पत्तियों को आपके टैंक में प्रवेश करने से रोक सकता है। ध्यान रखें कि यह व्यवस्था शुष्क प्रणालियों के लिए बेहतर अनुकूल है जहां पत्तियों के पाइप में बैठने की संभावना कम होती है।
अनियंत्रित छोड़ दिया, पत्तियां और मलबा कई संग्रह मुद्दों का मूल कारण हो सकता है। बस इस कदम को लागू करने और उचित उपाय करने से, आप आश्वस्त हो सकते हैं कि आपकी वर्षा संचयन प्रणाली आपको स्वच्छ वर्षा जल और ढेर सारा पानी देने के लिए बेहतर रूप से तैयार है।
चरण #5
अपने वर्षा जल को साफ करें: वर्षा जल के पहले प्रवाह को मोड़ें
अपने टैंक से दूर करने के लिए अपनी छत से सबसे दूषित वर्षा जल को चैनल, कैप्चर और अलग करने के लिए पहले फ्लश डायवर्सन का उपयोग करें।
चरण 4 में, बड़े संदूषकों और मलबे को हटाने पर ध्यान केंद्रित किया गया था। यहां से, वर्षा की घटना की शुरुआत में आपकी छत की सतह से आने वाले महीन तलछट, घुले हुए ठोस और किसी भी अन्य जमाव को हटाने के लिए उपाय करना लक्ष्य है।
बारिश नहीं होने की अवधि के बाद, आपकी छत पर मलबा जमा हो जाता है। एक बार जब बारिश फिर से शुरू हो जाती है, तो यह मलबा आपके सिस्टम में धुल जाएगा, जब तक कि आप पहले फ्लश को डायवर्ट नहीं करते। फर्स्ट फ्लश डायवर्टर किसी भी रेन हार्वेस्टिंग सिस्टम में एक महत्वपूर्ण भूमिका निभाते हैं, गंदे या खतरनाक कणों और महीन पदार्थों को आपके सिस्टम में बहने से रोकते हैं, और आपकी वर्षा जल आपूर्ति को दूषित करते हैं।
हालाँकि, इसे बर्बाद करने की आवश्यकता नहीं है, क्योंकि आप इस पानी को मैन्युअल रूप से खाली कर सकते हैं या इसे स्वचालित रूप से तूफानी पानी या अपने बगीचे में छोड़ सकते हैं।
प्रदूषकों से अपने पानी की आपूर्ति को सुरक्षित रखें
दो मुख्य प्रकार के प्रदूषक शुष्क निक्षेपण और आर्द्र निक्षेपण हैं।
शुष्क निक्षेपण वह पदार्थ है जो समय के साथ आपकी छत पर जमा हो जाता है, जिसमें धूल, गंदगी, पत्ते, मल या अन्य पशु पदार्थ शामिल हैं। यदि आप औद्योगिक क्षेत्रों या व्यस्त सड़कों के पास जाते हैं, तो कण हवा में भी फेंके जा सकते हैं और आपकी छत की सतह पर जमा हो सकते हैं।
गीला निक्षेपण वह है जो वर्षा होने पर आकाश से खींच लिया जाता है, इसलिए वह 'गीला' होता है। इनमें धुआं, औद्योगिक क्षेत्रों से वायु प्रदूषण, अम्ल वर्षा, और यहां तक कि जेट ईंधन भी शामिल हो सकता है यदि आप एक उड़ान पथ के पास रहते हैं।
वर्षा न होने की अवधि में, यह शुष्क जमाव समय के साथ संग्रह की सतह या छत पर बन सकता है। फिर, जब बारिश होती है, तो यह मामला आपके सिस्टम में धुल जाता है। आमतौर पर, बारिश की घटना के शुरुआती चरणों के दौरान अधिकांश मामले को धोया जाता है, ठीक उसी तरह जैसे एक गंदी कार को रखने से ढीली गंदगी निकल जाएगी। पहला फ्लश डायवर्जन तब होता है जब पानी के इस अधिक दूषित हिस्से को आपके टैंक से दूर निर्देशित किया जाता है, स्वचालित रूप से आपके टैंक में वापस जाने से पहले ताकि आप शेष वर्षा एकत्र कर सकें।
अगला कदम यह परिभाषित करना है कि आपको कितना पानी मोड़ना चाहिए - आपको अपने टैंक से बहुत अधिक दूर किए बिना पानी की इष्टतम गुणवत्ता प्रदान करने के लिए।
")

अपनी डायवर्जन आवश्यकताओं की गणना करना
हम जिस पानी की मात्रा को मोड़ना चाहते हैं, वह आपके पर्यावरणीय कारकों पर निर्भर करता है और आपको अपने सिस्टम से क्या चाहिए - इसलिए आपको पानी की मात्रा को तौलना होगा जिसे आप त्यागने के लिए खर्च कर सकते हैं।
जैसे ही बारिश की घटना शुरू होती है, यह बारिश के पहले कुछ मिलीमीटर के भीतर बड़ी मात्रा में गंदगी और मलबे को धो देती है। यह वह पानी है जिसे हम छोड़ना चाहते हैं - यह सबसे प्रदूषित है।
फिर हम बाकी पानी पर कब्जा करना शुरू करना चाहते हैं। अधिकांश पहले फ्लश डायवर्टर स्वचालित रूप से काम करते हैं और पानी की एक निश्चित मात्रा को मोड़ने के लिए कॉन्फ़िगर किया जा सकता है।
सबसे पहले, विचार करें कि क्या आप अपने भौगोलिक स्थान के आधार पर अपने क्षेत्र को निम्न, मध्यम या उच्च स्तर का प्रदूषण मानते हैं और आपके आस-पास किस प्रकार का वनस्पति या उद्योग है।
एक कम प्रदूषण वाले क्षेत्र को कम घनत्व वाले आवास क्षेत्र के रूप में परिभाषित किया गया है जिसमें पेड़, या किसी भी प्रमुख परिवहन गलियारे या उद्योग को लटकाया नहीं गया है। इस मामले में, आपको केवल पहले 0.25 मिमी वर्षा को मोड़ने की आवश्यकता है, जिसका अर्थ है कि यदि आपके पास 100m² का जलग्रहण क्षेत्र है, तो आप पहले 25 L को मोड़ देंगे।
इसके बाद, यदि आप एक मध्यम आबादी वाले क्षेत्र में हैं जहां प्रमुख सड़क मार्ग हैं और उद्योग और उड़ान पथों के सापेक्ष निकटता में हैं, लेकिन सीधे उनके नीचे नहीं हैं, तो आपको एक मध्यम प्रदूषण क्षेत्र के रूप में परिभाषित किया जाएगा। इस मामले में, आप पहले 0.5 मिमी वर्षा को मोड़ देंगे। तो अगर हमारे पास 100m² की समान छत है, तो इसका मतलब है कि हम 50L को मोड़ देंगे।
अंत में, यदि आप उद्योग, कृषि के बहुत करीब हैं, या आपके पास बहुत सारे पेड़ लटके हुए हैं, तो आपको एक उच्च प्रदूषण क्षेत्र के रूप में वर्गीकृत किया जाएगा, और आपको पहले 1 मिमी वर्षा या 100m² की छत के लिए 100L को मोड़ना होगा।
आपको कितनी मात्रा में डायवर्ट करने की आवश्यकता है और आप इसे कहां लगाने जा रहे हैं, इस पर निर्भर करते हुए बहुत सारे पहले फ्लश समाधान हैं। कुछ को पहले फ्लश पानी को फेंकने से पहले अस्थायी रूप से रखने के लिए एक छोटे कक्ष की आवश्यकता होगी, जबकि अन्य स्वचालित रूप से एक मध्यवर्ती भंडारण पोत की आवश्यकता के बिना पानी को मोड़ देंगे।
आप जो भी प्रकार चुनते हैं, पहले फ्लश को मोड़ने से आपके द्वारा एकत्र किए जाने वाले वर्षा जल की गुणवत्ता में काफी सुधार हो सकता है। यह किसी भी वर्षा संचयन प्रणाली के सबसे महत्वपूर्ण घटकों में से एक है।
चरण #6
अपना सुरक्षित करें
वर्षा जल प्रणाली
अपने सिस्टम के प्रवेश और निकास बिंदुओं को सुरक्षित करके, आप छिपी हुई गतिविधि को कम करने और अपने वर्षा जल की गुणवत्ता को बनाए रखने के लिए जानवरों, कीड़ों, धूप और गंदे पानी को बाहर रख सकते हैं।
पिछले चरणों में, आपने अपने टैंक में अच्छी गुणवत्ता वाला पानी सुनिश्चित करने के लिए कदम उठाए हैं। यह महत्वपूर्ण कदम टैंक पर ही केंद्रित है, और आपके पानी की सुरक्षा सुनिश्चित करने के लिए आवश्यक उपकरण और उद्देश्य के लिए स्वच्छ और फिट रहता है।
अवांछित घुसपैठियों जैसे जानवरों, कीड़ों, धूप, तूफानी पानी और भूजल को बाहर रखा जाना चाहिए क्योंकि वे आपकी वर्षा जल आपूर्ति को दूषित कर सकते हैं और आपके टैंकों और पाइपों में हानिकारक छिपी गतिविधि को बढ़ा सकते हैं।
अधिक विशेष रूप से, आपको संभावित दूषित पदार्थों को बाहर रखने के लिए प्रवेश और निकास बिंदुओं के साथ-साथ किसी भी अन्य उद्घाटन को सुरक्षित करने की आवश्यकता होगी।
अपने टैंक इनलेट की सुरक्षा करना
आपके प्रवेश द्वार पर, कॉल का पहला बंदरगाह पत्तियों और कीटों को आपके टैंक में प्रवेश करने से रोकना है। टैंक स्क्रीन एक प्रभावी उपकरण है जो दूषित पदार्थों को बाहर रखने के लिए निस्पंदन की एक और परत प्रदान करने के लिए एक महीन जालीदार स्क्रीन का उपयोग करता है।
आपके टैंक में जितना कम कार्बनिक पदार्थ प्रवेश करेगा - आपके पानी की गुणवत्ता उतनी ही बेहतर होगी। मच्छरों को बाहर रखने के लिए जाली को 1 मिमी से कम रखना महत्वपूर्ण है, हालाँकि, आप अपने टैंक में प्रवेश करने से धूल और गाद जैसे छोटे खतरों को भी खत्म करने के लिए और भी महीन जाली का उपयोग कर सकते हैं।
इसके बाद, आपको अपने टैंक इनलेट में शैवाल के बढ़ने की संभावना को सीमित करने के विकल्पों पर विचार करना होगा। शैवाल को बढ़ने के लिए कार्बनिक पदार्थ और सूर्य के प्रकाश की आवश्यकता होती है। जबकि टैंक स्क्रीन कार्बनिक पदार्थों से निपटने में प्रभावी हैं, एक सौर ढाल या टैंक कवर प्रकाश को अवरुद्ध करने और आपकी आपूर्ति की रक्षा करने में मदद करता है। ऐसे कई विकल्प हैं जिन्हें या तो टैंक स्क्रीन के नीचे रखा जा सकता है या कवर के ऊपर रखा जा सकता है
")

अपने टैंक ओवरफ्लो और आउटलेट को सुरक्षित करना
एक बार इनलेट है सुरक्षित, यह आपके टैंक के अतिप्रवाह पर ध्यान केंद्रित करने का समय है। लक्ष्य वही रहता है, यह सुनिश्चित करने के लिए कि टैंक कीटों और मलबे से सुरक्षित है।
मच्छर प्रूफ स्क्रीन विशेष रूप से मच्छरों और अन्य कीटों को दूर रखने के लिए डिज़ाइन किया गया है। यह महत्वपूर्ण है कि आपके ओवरफ्लो पाइप पर एक माउंट किया गया हो, चाहे वह सीधे टैंक पर हो या उस लाइन से आगे जहां इसे आसानी से पहुँचा जा सके। सुनिश्चित करें कि आपके पास इसे एक्सेस करने की क्षमता है ताकि आप बायोफिल्म या छोटे मलबे के किसी भी निर्माण को रोकने के लिए समय-समय पर उन्हें साफ कर सकें जो अंततः आपके सिस्टम में रेंग सकते हैं।
जब आप सिस्टम को सेट अप कर रहे हों, तो आपको यह सुनिश्चित करने की ज़रूरत है कि आपके ओवरफ्लो में पानी की समान प्रवाह दर को संभालने की क्षमता है जैसे पाइप आपके टैंक में प्रवेश कर रहे हैं। इसका मतलब है कि अतिप्रवाह एक ही आकार या इनलेट से बड़ा होना चाहिए, इसलिए आप ऐसी स्थिति में नहीं हैं जहां आपके टैंक में अधिक पानी आ रहा है जितना बाहर निकल सकता है। इसका मतलब है कि भारी बारिश की घटना के दौरान अतिप्रवाह हमेशा प्रभावी ढंग से बहेगा।
बैकफ्लो से बचाव
यदि आप नगरपालिका के तूफानी पानी से जुड़े हैं, तो अपने टैंक को बैकफ्लो से सुरक्षित रखना महत्वपूर्ण है जो कि तूफानी जल प्रणाली में हो सकता है।
भारी बारिश के दौरान भी, अगर पानी को स्टॉर्मवॉटर लाइनों या गली में जमा किया जाता है, तो यह आपके टैंक की ओर वापस प्रवाहित हो सकता है और संभावित रूप से आपकी पूरी जल आपूर्ति को दूषित कर सकता है।
इसे रोकने के लिए, एक एयर गैप स्थापित करने की सिफारिश की जाती है, जो आपके टैंक ओवरफ्लो लाइन में एक भौतिक ब्रेक है ताकि तूफान के पानी को आपके टैंक में वापस आना असंभव हो।

चरण #7
एक पंप या गुरुत्वाकर्षण फेड सिस्टम पर निर्णय लें
अपने अंतिम उपयोग के आधार पर अपने टैंक से पानी निकालने का सबसे अच्छा तरीका खोजें।
अब जब आपका वर्षा जल संग्रह और भंडारण प्रणालियों को अनुकूलित कर लिया गया है, तो यह निर्धारित करने के लिए ध्यान केंद्रित करने का समय आ गया है कि पानी आपके सिस्टम से कैसे गुजरने वाला है। जिस तरह से आप अपने पानी का उपयोग करते हैं, आपके सिस्टम का डिज़ाइन, और आपकी संपत्ति की स्थलाकृति इस बात को प्रभावित करेगी कि आप गुरुत्वाकर्षण-आधारित प्रणाली का उपयोग करते हैं, पंप का उपयोग करते हैं, या दोनों का संयोजन करते हैं।
ग्रेविटी फेड सिस्टम
गुरुत्वाकर्षण-आधारित प्रणालियाँ उपयुक्त होती हैं जहाँ आपके पास भंडारण बिंदु और उपयोग बिंदु के बीच बहुत अधिक सिर की ऊँचाई होती है, या ऐसी स्थितियों में जहाँ आपको उच्च दबाव की आवश्यकता नहीं होती है, जैसे कि अपने पूल को ऊपर उठाना या कम दबाव वाली सिंचाई। बशर्ते आपके सिर की ऊंचाई में पर्याप्त अंतर हो, इनमें से कोई भी स्थिति गुरुत्वाकर्षण-आधारित प्रणाली के लिए आदर्श रूप से अनुकूल है।


पंप प्रणाली
अगला विकल्प एक पंप का उपयोग कर रहा है। पंप सुनिश्चित करते हैं कि आपके पास हर समय आवश्यक दबाव है, और हैं कम आपके सिस्टम या संपत्ति के लेआउट से प्रभावित।
पंप चुनते समय कुछ विचार हैं। प्राथमिक ध्यान के रूप में, आपको यह समझने की आवश्यकता है कि कितना पानी उपयोग किया जा रहा है और उस पंप का चयन करें जिसमें आपकी आवश्यकताओं के लिए उपयुक्त प्रवाह दर हो। इसके लिए माध्यमिक, आपको यह सुनिश्चित करने की आवश्यकता है कि पंप में पानी को पंप करने के लिए आवश्यक ऊंचाई के आधार पर सही क्षमताएं हैं, और आप किस प्रकार के टैंक से पानी खींच रहे हैं।
चूंकि विभिन्न शक्ति और स्थापना आवश्यकताओं वाले कई अलग-अलग प्रकार के पंप हैं, इसलिए अपनी आवश्यकताओं के बारे में पंप विशेषज्ञ से बात करना महत्वपूर्ण है। यदि आप उन्हें अपना सिस्टम डिज़ाइन दिखाते हैं, और अपनी ज़रूरतों पर चर्चा करते हैं, तो वे सही मॉडल चुनने में आपकी सहायता करने में सक्षम होंगे, और इसे स्थापित करने का सबसे अच्छा तरीका ताकि आप अपने सिस्टम को यथासंभव कुशल बना सकें।
संयोजन
एक अन्य लोकप्रिय सेटअप हैडर टैंक तक पानी स्थानांतरित करने के लिए एक पंप का उपयोग करना। वहां से, यह अनिवार्य रूप से एक गुरुत्वाकर्षण-आधारित प्रणाली बन जाती है जिसे पंप के बिना निरंतर उपयोग के लिए आसानी से निर्देशित किया जा सकता है क्योंकि इसमें पर्याप्त दबाव बनाया गया है। इस परिदृश्य में, आप बिजली का संरक्षण कर सकते हैं और चुन सकते हैं कि आपके लिए टैंक तक पानी पंप करना कब सुविधाजनक है, उदाहरण के लिए जब बिजली उपलब्ध हो या सस्ती हो

प्रत्येक परिदृश्य का अपना स्थान होता है, बस यह तय करने के लिए अपने सेट-अप और आवश्यकताओं का जायजा लें कि कौन सी प्रणाली आपके और आपकी संपत्ति के लिए सबसे उपयुक्त होगी।
चरण #8
खड़े पानी का प्रबंधन करें
अपने टैंक और पाइपवर्क में बैठे पानी की देखभाल करके, आपको अच्छी गुणवत्ता वाला पानी सुनिश्चित किया जाता है।
उच्च गुणवत्ता वाला पानी इकट्ठा करना आधी लड़ाई है। हालाँकि, यदि आप चाहते हैं कि आपकी वर्षा जल आपूर्ति उद्देश्य के लिए उपयुक्त बनी रहे, तो आपको अपने द्वारा काटे गए पानी की गुणवत्ता को भी बनाए रखना होगा। छिपी गतिविधि को रोकने और सीमित करने के लिए अपने सिस्टम के भीतर अपने खड़े पानी का प्रबंधन करना इसे प्राप्त करने के लिए केंद्रीय है।
एक बार सिस्टम में बारिश का पानी जमा हो जाने के बाद, यह सुनिश्चित करने के लिए दो क्षेत्र हैं कि आप एक उच्च गुणवत्ता बनाए रख सकते हैं - टैंक के अंदर का पानी, साथ ही पूरे सिस्टम में किसी भी पाइपवर्क में बैठा पानी।
इस कदम के लिए तीन मुख्य लक्ष्य हैं तलछट के पुन: निलंबन को रोकना, शैवाल के विकास के अवसर को कम करना और पाइपवर्क के भीतर अवायवीय किण्वन के अवसर को रोकना
तलछट के निलंबन को रोकें
समय के साथ, टैंक के आधार पर तलछट की एक परत का निर्माण होना स्वाभाविक है। जिस गति से तलछट जमा होती है, वह निस्पंदन के स्तर द्वारा नियंत्रित होती है जो पहले से रेन हेड्स या फर्स्ट फ्लश डायवर्टर जैसे उपकरणों के साथ स्थापित होती है।
उस ने कहा, टैंक के आधार में तलछट होना एक बुरी बात नहीं है क्योंकि यह आम तौर पर टैंक के आधार पर तब तक रहेगा जब तक कि इसे उभारा और पुन: निलंबित न किया जाए। ऐसा होने की संभावना को कम करना महत्वपूर्ण है ताकि यह आपके पानी की आपूर्ति में न आए। इस तलछट के पुनर्निलंबन को रोकने के लिए पहला कदम टैंक के आधार पर एक छोटा बफर बनाना है, ताकि जब आपका जल स्तर कम हो, तब भी तलछट में हलचल न हो। बफर बनाने का सबसे आसान तरीका यह सुनिश्चित करना है कि जिस आउटलेट से आप पानी निकालते हैं वह टैंक के आधार से कम से कम 100 मिमी (4 इंच) दूर हो। पानी की यह परत किसी भी आने वाले पानी के भार को खत्म करने में मदद करती है। बेशक, जब टैंक आंशिक रूप से या पूरी तरह से भरा होता है तो यह कोई समस्या नहीं है क्योंकि बहुत बड़ा बफर होता है।
अपने टैंक में पानी के प्रवाह को नियंत्रित करने का दूसरा तरीका एक शांत प्रवेश द्वार है। यह टैंक में प्रवेश करते ही पानी की दिशा बदल देगा ताकि यह सीधे तलछट की परत पर न गिरे - पानी का स्तर कम होने पर भी इसके हिलने की संभावना कम हो जाती है।

")
शैवाल विकास को रोकें
शैवाल को बढ़ने के लिए सूर्य के प्रकाश और पोषक तत्वों की आवश्यकता होती है (क्योंकि यह किसी अन्य पौधे की तरह प्रकाश संश्लेषण करता है)। टैंक स्क्रीन और रेन हेड्स टैंक में पोषक तत्वों के भार को कम कर देंगे, लेकिन सूरज की रोशनी को रोकने के लिए आपको सोलर शील्ड की आवश्यकता होगी। विभिन्न प्रकार के सौर ढाल विभिन्न तरीकों का उपयोग करके प्रकाश को अवरुद्ध करते हैं। कुछ ने तो आपके टैंक में पानी के प्रवाह को फैलाने में मदद करने के लिए एकीकृत पंख भी लगाए हैं ताकि तलछट के पुन: निलंबन की संभावना को और कम किया जा सके।
ड्रेन चार्ज सिस्टम
आपके वर्षा जल प्रणाली का एक अन्य क्षेत्र जहां आपके पानी की गुणवत्ता को बनाए रखना महत्वपूर्ण है, वह आपके पाइपवर्क में है। गीले या आवेशित वर्षा जल प्रणालियों के मामले में यह विशेष रूप से महत्वपूर्ण है क्योंकि वर्षा की घटनाओं के बीच पाइपों में पानी के खड़े होने की संभावना अधिक होती है।
यदि इसकी सावधानीपूर्वक निगरानी नहीं की जाती है, तो आपका पानी खराब स्वाद या अवायवीय किण्वन का खराब हो सकता है। इस प्रक्रिया का अनिवार्य रूप से मतलब है कि पाइपवर्क के भीतर पाए जाने वाले ऑक्सीजन के निम्न स्तर और कार्बनिक पदार्थों के साथ इसकी बातचीत के परिणामस्वरूप आपका पानी "बंद" हो सकता है।
आपके टैंक की तरह ही, इस पाइपवर्क में सामान्य रूप से थोड़ी मात्रा में कार्बनिक पदार्थ जमा होते हैं। हालांकि, जैसा कि चरण 4 में बताया गया है, सिस्टम से पहले रेन हेड्स स्थापित करके इसे कम करना महत्वपूर्ण है।
इस पानी के रुकने की संभावना को कम करने का एक आसान तरीका है कि आप समय-समय पर अपनी चार्ज लाइनों को हटा दें। यह आपके टैंक में वर्षा जल को दूषित होने से रोकने के लिए एक सरल और प्रभावी तरीका है। आपके स्थान और सेटअप के आधार पर - प्रत्येक वर्षा की घटना के बाद लाइनों को निकालना आवश्यक हो सकता है, लेकिन अक्सर हर कुछ सप्ताह या महीने पर्याप्त होंगे - यह मलबे के भार, आपके द्वारा पीछा किए जा रहे पानी की गुणवत्ता और आपके द्वारा पानी की मात्रा पर निर्भर करता है। बलिदान करने में सक्षम हैं।
आप इसे मैन्युअल वाल्व के साथ, या प्रोग्राम किए गए अंतराल के साथ स्वचालित संस्करण के साथ करना चुन सकते हैं। आप जो भी विकल्प चुनते हैं, यह सुनिश्चित करने के लिए कि आप पानी के पूरे शरीर को निकाल रहे हैं, इस उपकरण को अपनी चार्ज लाइन के सबसे निचले हिस्से में स्थापित करना सबसे अच्छा अभ्यास है।
हमारे द्वारा वर्णित कुछ या सभी तत्व आपके सिस्टम पर लागू हो सकते हैं। उन प्रथाओं को अपनाएं जो आपके सिस्टम के अनुकूल हों, और यह सुनिश्चित करेगा कि आपका वर्षा जल अपने सर्वोत्तम स्तर पर बना रहे।
चरण #9
अंतिम चरण वर्षा जल निस्पंदन
उपयोग करने से पहले वर्षा जल से तलछट, रंग और गंध को कम करें।
इस चरण में, यह विचार करना महत्वपूर्ण है कि आप अपने वर्षा जल को इसके अंतिम उपयोग में कैसे लागू करने जा रहे हैं, और यदि आपके परिणामों को अधिकतम करने के लिए किसी और निस्पंदन की आवश्यकता है।
आपके लिए आवश्यक गुणवत्ता निर्धारित करने के लिए उपयोग के तीन मुख्य क्षेत्र हैं जिन पर आपको विचार करना चाहिए:
सिंचाई और उद्यान उपयोग
यदि आप मुख्य रूप से सिंचाई और बगीचे के उपयोग के लिए अपने वर्षा जल का उपयोग कर रहे हैं, तो आपको किसी और निस्पंदन की आवश्यकता नहीं होगी क्योंकि यदि आपने इस बिंदु पर उचित कदम उठाए हैं तो आपका संग्रहित पानी पहले से ही उपयुक्त गुणवत्ता का होगा।
केवल एक अन्य विचार रखरखाव के दृष्टिकोण से होगा क्योंकि कुछ सिंचाई प्रणालियाँ वर्षा जल में तलछट के लिए अतिसंवेदनशील हो सकती हैं।
इस मामले में, एक तलछट फ़िल्टर स्थापित करने से किसी भी रखरखाव की आवश्यकता कम हो जाएगी और यह सुनिश्चित हो जाएगा कि आपकी सिंचाई प्रणाली लंबे समय तक बेहतर प्रदर्शन करती है। आपकी सिंचाई प्रणाली के घटकों को फ़िल्टर करने के लिए आकार निर्दिष्ट करना चाहिए, लेकिन कम से कम 100 माइक्रोन से शुरू करने की सिफारिश की जाती है, यदि थोड़ा छोटा नहीं है।

आंतरिक उपकरण और शौचालय
आंतरिक उपकरणों और शौचालयों के लिए पानी का उपयोग करते समय, आपको अपनी संपत्ति के आसपास मौजूद वनस्पतियों और इसके बाद आपके सिस्टम में पानी पर पड़ने वाले प्रभाव के प्रति सावधान रहने की आवश्यकता होगी। आवश्यक पानी की गुणवत्ता के इस स्तर पर, आप टैनिन, रंग और गंध को कम करते हुए तलछट को हटाना चाहते हैं ताकि आपके उपकरणों पर किसी भी तरह का दाग न लगे।
ऐसा करने का सबसे प्रभावी तरीका दोहरे चरण का निस्पंदन सिस्टम है। पहला चरण तलछट और छोटे कणों को हटाता है, और फिर दूसरा चरण कार्बन फिल्टर को फ़िल्टर करता है जो विशेष रूप से रंग और गंध में सुधार करता है।
नहाना और पीना
बारिश और पीने सहित सभी उद्देश्यों के लिए वर्षा जल का उपयोग करते समय गुणवत्ता के अगले चरण की आवश्यकता होती है। इस परिदृश्य में, फिल्टर सिस्टम को यथासंभव स्वच्छ पानी देने की जरूरत है।
जबकि एक दोहरी-चरण प्रणाली पर्याप्त हो सकती है, एक ट्रिपल-चरण प्रणाली आपको निस्पंदन स्तर को और अधिक धीरे-धीरे नीचे ले जाने की अनुमति देती है। यह प्रगतिशील दृष्टिकोण सुनिश्चित करेगा कि प्रत्येक फ़िल्टर एक टीम के हिस्से के रूप में कुशलता से काम कर रहा है, और यह कि कोई फ़िल्टर ओवरलोड नहीं हो रहा है। यह आपके सिस्टम को लंबे समय तक अधिक प्रभावी ढंग से प्रदर्शन करना जारी रखने की अनुमति देता है।

जैसा कि आप देख सकते हैं, आपके सिस्टम की स्थापना के तरीके में आपके वर्षा जल का अंतिम उपयोग एक बड़ी भूमिका निभाता है, और वांछित परिणाम प्राप्त करने के लिए आवश्यक निस्पंदन है। आपकी ज़रूरतें जितनी अधिक विविध होंगी, यह सुनिश्चित करने के लिए कि आपके सिस्टम को सफलता के लिए स्थापित किया गया है, उतनी ही अधिक निस्पंदन की आवश्यकता है।
चरण #10
अपने ओवरफ्लो का अनुकूलन करें
यह सुनिश्चित करने के लिए अपने अतिप्रवाह का अनुकूलन करें कि आपका टैंक हमेशा सबसे अच्छा प्रदर्शन कर रहा है, यहां तक कि उच्च वर्षा की घटनाओं के दौरान भी।
आपके सिस्टम को स्थापित करते समय आपके टैंक का अतिप्रवाह अक्सर एक विचार हो सकता है। हालांकि, यह सुनिश्चित करने के लिए अपने घटकों का चयन करना और उन्हें सही ढंग से कॉन्फ़िगर करना महत्वपूर्ण है कि अतिप्रवाह आपके वर्षा जल संग्रह प्रयासों के समग्र प्रदर्शन को प्रतिबंधित नहीं करता है
अतिप्रवाह पर विचार करना महत्वपूर्ण है क्योंकि अधिकांश टैंक पूरी तरह से भरने या दबाव बनने के लिए डिज़ाइन नहीं किए गए हैं। इसका मतलब यह है कि जब आपका टैंक भर जाता है, तो आपको किसी भी अतिरिक्त पानी को सुरक्षित रूप से बाहर निकलने की अनुमति देने के लिए उपायों की आवश्यकता होती है, खासकर भारी वर्षा की घटनाओं में।
इष्टतम अतिप्रवाह समारोह में पहला कदम यह सुनिश्चित करना है कि अतिप्रवाह एक ही आकार या इनलेट से बड़ा है। यह सुनिश्चित करता है कि जब भारी वर्षा की घटना में टैंक भर जाता है, तो पानी आपके टैंक से इनलेट से फैलने के बजाय डिज़ाइन के अनुसार बह सकता है।
इसके अतिरिक्त, टैंक में कीटों को प्रवेश करने से रोकने के लिए आपके अतिप्रवाह को मच्छर रोधी स्क्रीन से सुसज्जित किया जाना चाहिए। मेश स्क्रीन का आकार और प्रकार इस बात को प्रभावित करेगा कि आपको कितनी बार यूनिट को बनाए रखने की आवश्यकता है। स्क्रीन जितनी बड़ी होगी, आपके अतिप्रवाह पर किसी भी प्रवाह प्रतिबंध की संभावना उतनी ही कम होगी। ठीक से काम करते रहने के लिए, आपको किसी भी बायोफिल्म और छोटे मलबे को हटाने के लिए समय-समय पर रखरखाव के लिए स्क्रीन को हटाने में सक्षम होना चाहिए।
जैसा कि आप देख सकते हैं, अतिप्रवाह को नजरअंदाज नहीं किया जाना चाहिए। समायोजनों की केवल एक छोटी संख्या के साथ, एक अनुकूलित अतिप्रवाह प्रक्रिया में आपका शेष सिस्टम एक स्तर पर प्रदर्शन कर सकता है जो किसी भी संभावित अपव्यय को कम करते हुए अधिक स्वच्छ पानी को पकड़ने में आपकी सहायता करेगा।
चरण #11
अपने जल स्तर की निगरानी करें
अपने वर्षा जल के उपयोग को अनुकूलित करने के लिए अपने उपयोग को रिकॉर्ड करें।
अपने उपयोग और आवश्यकताओं को ट्रैक करने के लिए डेटा का उपयोग करें
हमारे पानी के उपयोग के बारे में जागरूक होना और जहां हम कर सकते हैं उसका संरक्षण करना महत्वपूर्ण है, चाहे आप एक केंद्रीकृत, नगरपालिका जल आपूर्ति या अपने स्वयं के वर्षा जल प्रणाली पर हों।
अपने उपयोग को समझने के लिए पहला कदम इसे ट्रैक और मॉनिटर करना है। यदि आप नगरपालिका जल आपूर्ति पर हैं, तो आपके पानी के बिल आपको सूचित करते हैं कि आप कितने पानी का उपयोग करते हैं।
हालाँकि, यदि आप केवल अपने वर्षा जल का उपयोग कर रहे हैं, तो आपको एक गेज स्थापित करने की आवश्यकता होगी। इस मामले में, अपने जल स्तर पर कड़ी नज़र रखना और भी महत्वपूर्ण है ताकि आप ज़रूरत के समय में कमी न करें।
सौभाग्य से, बुनियादी एनालॉग गेज से लेकर मॉडल तक, जो आपके मोबाइल डिवाइस, फोन या कंप्यूटर से कनेक्ट हो सकते हैं, कहीं से भी वास्तविक समय में आपके स्तरों तक पहुंच को सक्षम करने के लिए कई विकल्प उपलब्ध हैं। यह डेटा न केवल आपको अपने वर्तमान स्तरों को ट्रैक करने में मदद करेगा, बल्कि समय के साथ आपके स्तरों और उपयोग के रुझानों का विश्लेषण करेगा, जिससे आप आगे की योजना बना सकेंगे, अपने सेट-अप को बदल सकेंगे और आवश्यकता पड़ने पर अपनी आदतों को समायोजित कर सकेंगे।
अपने सिस्टम के लिए सही गेज चुनें
आपकी वर्षा जल प्रणाली के अलग-अलग तत्वों के आधार पर, टैंक गेज की एक श्रृंखला होती है जो आपकी आवश्यकताओं के लिए उपयुक्त हो सकती है।
स्मार्ट गेज
स्मार्ट गेज आपके पानी के उपयोग को दिन-प्रतिदिन ट्रैक करने के साथ-साथ पूरे वर्ष मौसमी रुझानों को ट्रैक करने के लिए डिज़ाइन किए गए हैं। वे आपके किसी भी उपकरण से आसानी से जुड़ सकते हैं ताकि आप अपने सभी ऐतिहासिक डेटा को स्वचालित रूप से ट्रैक कर सकें, और आगे बढ़ने से निर्णय लेने के लिए आपको डेटा का एक मजबूत आधार प्रदान कर सकें।


एनालॉग गेज
यदि आप यांत्रिक या एनालॉग उपकरण पसंद करते हैं, तो चुनने के लिए कई गेज हैं जो आपको वर्तमान जल स्तर को सटीक रूप से पहचानने में मदद करेंगे। यहां से, आप रुझान निर्धारित करने के लिए मैन्युअल रूप से डेटा रिकॉर्ड कर सकते हैं।
आप चाहे किसी भी प्रकार का चयन करें, एक गेज होने से आपको अपने पानी के उपयोग के शीर्ष पर बने रहने में मदद मिलेगी ताकि आपको अपनी वर्षा संचयन प्रणाली का सर्वोत्तम लाभ मिल सके।
चरण #12
अपने सिस्टम की देखभाल करें
अपने सिस्टम को सर्वोत्तम तरीके से चालू रखने के लिए समय-समय पर उसका निरीक्षण करें।
इन 12 चरणों के दौरान, आपने अपनी आवश्यकताओं के लिए सर्वोत्तम वर्षा संचयन प्रणाली तैयार करने और योजना बनाने का तरीका सीखा है, लेकिन सर्वोत्तम वर्षा जल संग्रहण प्रणाली को भी कुछ रखरखाव की आवश्यकता होती है।
एक बार जब आप अपना सिस्टम सेट कर लेते हैं, तो आपको पहली बारिश के बाद इसकी बारीकी से निगरानी करने की आवश्यकता होगी ताकि आप समझ सकें कि सिस्टम के प्रत्येक भाग से पानी बहने के बाद यह कैसा दिखता है।
सबसे बुनियादी स्तर पर, आपको यह सुनिश्चित करने की ज़रूरत है कि सभी तत्व ठीक से जुड़े हुए हैं और पानी बिना रिसाव के सिस्टम से बहने में सक्षम है।
यह समझना महत्वपूर्ण है कि आपके सिस्टम के विभिन्न तत्वों को अलग-अलग अंतराल पर निरीक्षण की आवश्यकता होगी।

पत्तियों और मलबे के लिए जाली की जाँच करें
आप जिन मुख्य क्षेत्रों का निरीक्षण करना चाहते हैं, वे सभी क्षेत्र हैं जिनमें जाली है, क्योंकि ये ऐसे स्थान हैं जहां पत्तियां और मलबा समय के साथ जमा हो सकता है।
रेन हेड्स के लिए, स्क्रीन की जांच करें और किसी भी पत्ते को ब्रश करें। यदि आपके पास बकेट-स्टाइल या ढका हुआ रेन हेड है, तो इन पर अधिक ध्यान देने की आवश्यकता होगी क्योंकि वर्षा की घटना के दौरान पत्तियां जाल से स्वाभाविक रूप से नहीं गिर सकती हैं।
जाल के साथ अन्य क्षेत्रों के लिए भी यही होता है - टैंक स्क्रीन, ओवरफ्लो और वायु अंतराल का निरीक्षण करें और उन्हें बैकवाश करें या यदि आवश्यक हो तो उन्हें ब्रश करें।
अपना पहला फ्लश और वाल्व साफ़ करें
जब आपके पहले फ्लश सिस्टम की बात आती है, तो आप मलबे के किसी भी संचय के लिए आउटलेट की जांच करना चाहेंगे। आंतरिक छलनी की जांच करने के लिए इकाई को खोलें, इसे बाहर निकालें और इसे बैकवाश दें। इस बात पर ध्यान दें कि कितना मलबा इकट्ठा हुआ है ताकि आप अनुमान लगा सकें कि भविष्य में आपको इसे कितनी बार करने की आवश्यकता होगी।
कोई रुकावट नहीं है यह सुनिश्चित करने के लिए इस बिंदु पर रिलीज वाल्व की जांच करना भी एक अच्छा विचार है। यदि आपके पास एक स्वचालित गीले-सूखे वाल्व के साथ एक गीला सिस्टम है, तो इसमें एक ही तरह का स्ट्रेनर होगा जो पहले फ्लश डिवाइस के रूप में होता है, इसलिए तदनुसार निरीक्षण करें और इसे साफ करें। यदि आपके पास स्वचालित वाल्व नहीं है, तो आप समय-समय पर अपनी चार्ज लाइनों को निकालना चाहेंगे।
यहां से, अंतिम चरण के निस्पंदन सिस्टम की जांच करने के लिए अपना रास्ता बनाएं। चूंकि यह अंतिम उपयोग से पहले अंतिम तत्व है, इसलिए इसे अधिक नियमितता के साथ जांचा जाना चाहिए और हर छह महीने में स्विच किया जाना चाहिए।

जीवन में किसी भी चीज़ की तरह, अच्छी आदतें बनाने से यह सुनिश्चित होगा कि आपकी वर्षा संचयन प्रणाली को अपने सर्वश्रेष्ठ प्रदर्शन को बनाए रखना आसान है। जब आपका सिस्टम सही उत्पादों के साथ बनाया जाता है, तो इसे बनाए रखना आसान हो जाएगा। नियमित अंतराल पर कुछ मिनटों का निवेश आपके सिस्टम को सुचारू रूप से चलाने के लिए एक लंबा रास्ता तय करेगा।
हालांकि यह प्रत्येक संपत्ति के लिए अलग-अलग है, यह अनुशंसा की जाती है कि आप अपने सिस्टम को स्थापित करने के बाद शुरुआती महीनों में नियमित रूप से आवधिक जांच करें, और फिर वहां से आप अपने निष्कर्षों के आधार पर अनुकूलन कर सकते हैं।
सिस्टम डिज़ाइन के उदाहरण
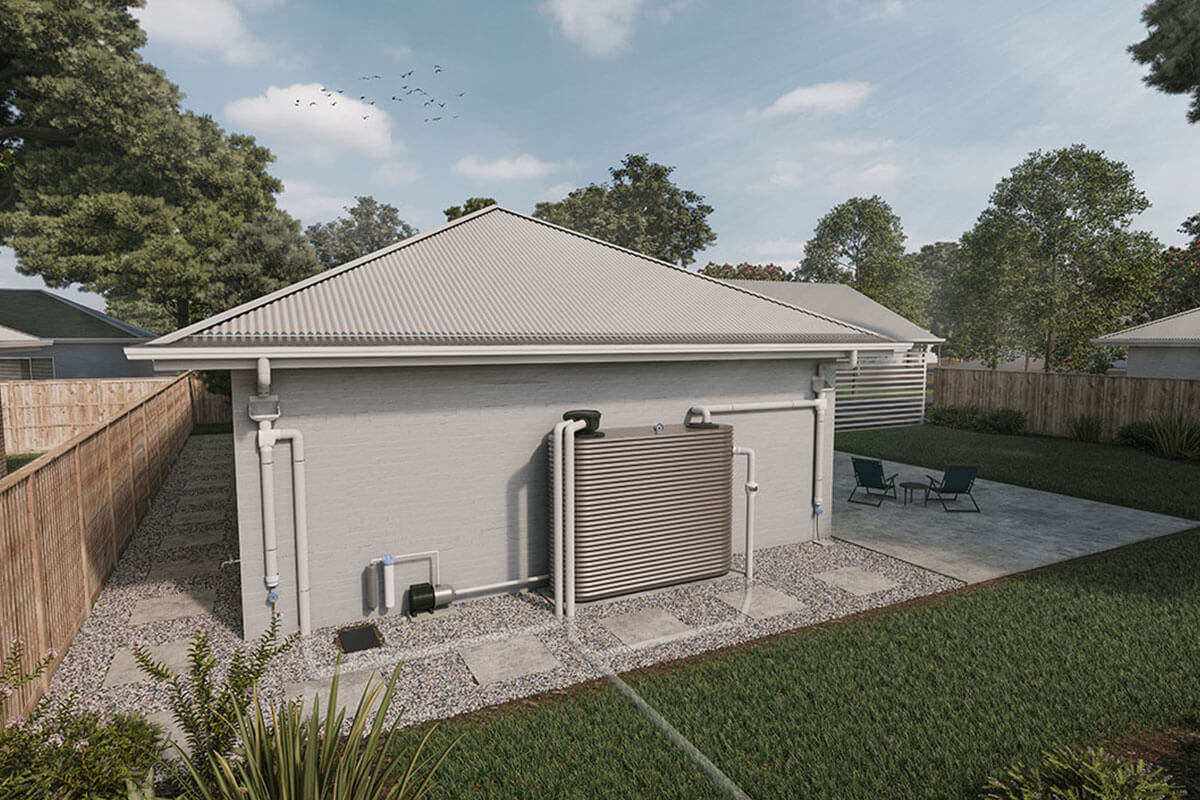
आवासीय - जमीन के ऊपर स्लिमलाइन टैंक के साथ गीला और सूखा संयोजन
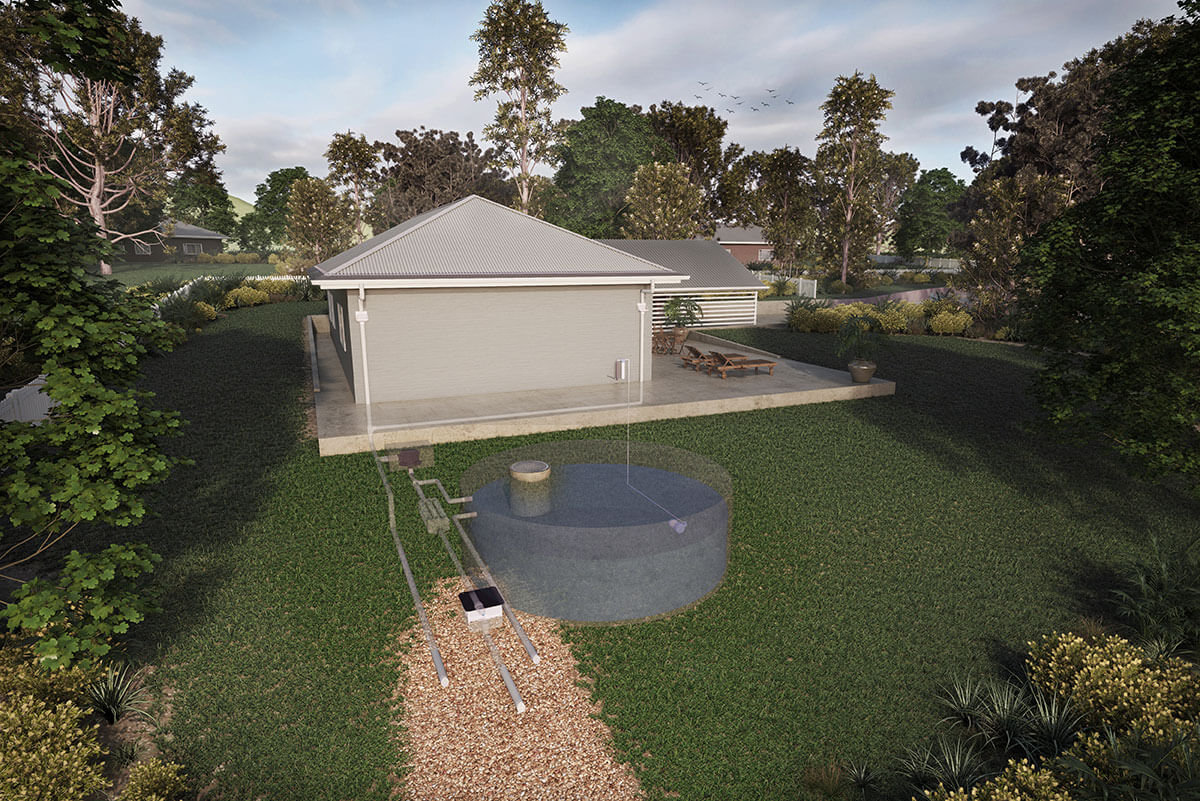
आवासीय - इन-ग्राउंड कंक्रीट टैंक के साथ गीली प्रणाली
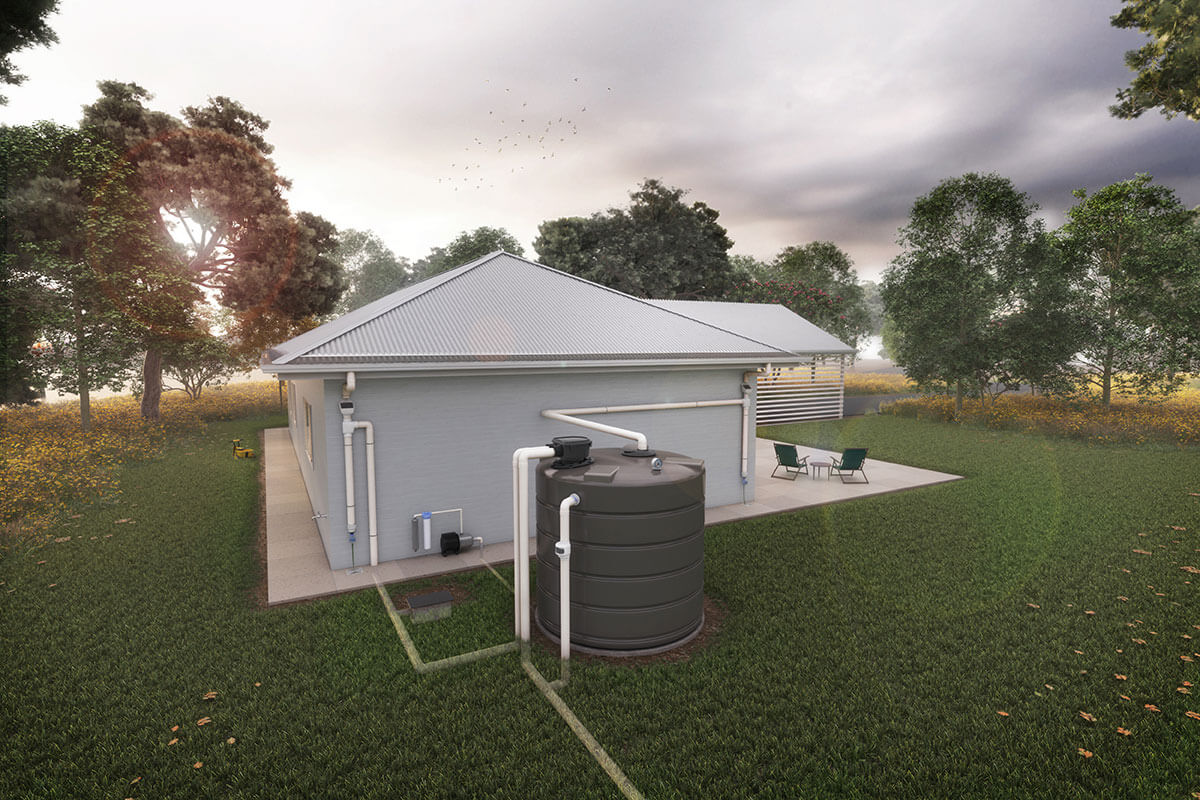
आवासीय - जमीन के ऊपर पॉली टैंक के साथ गीली और सूखी प्रणाली का संयोजन
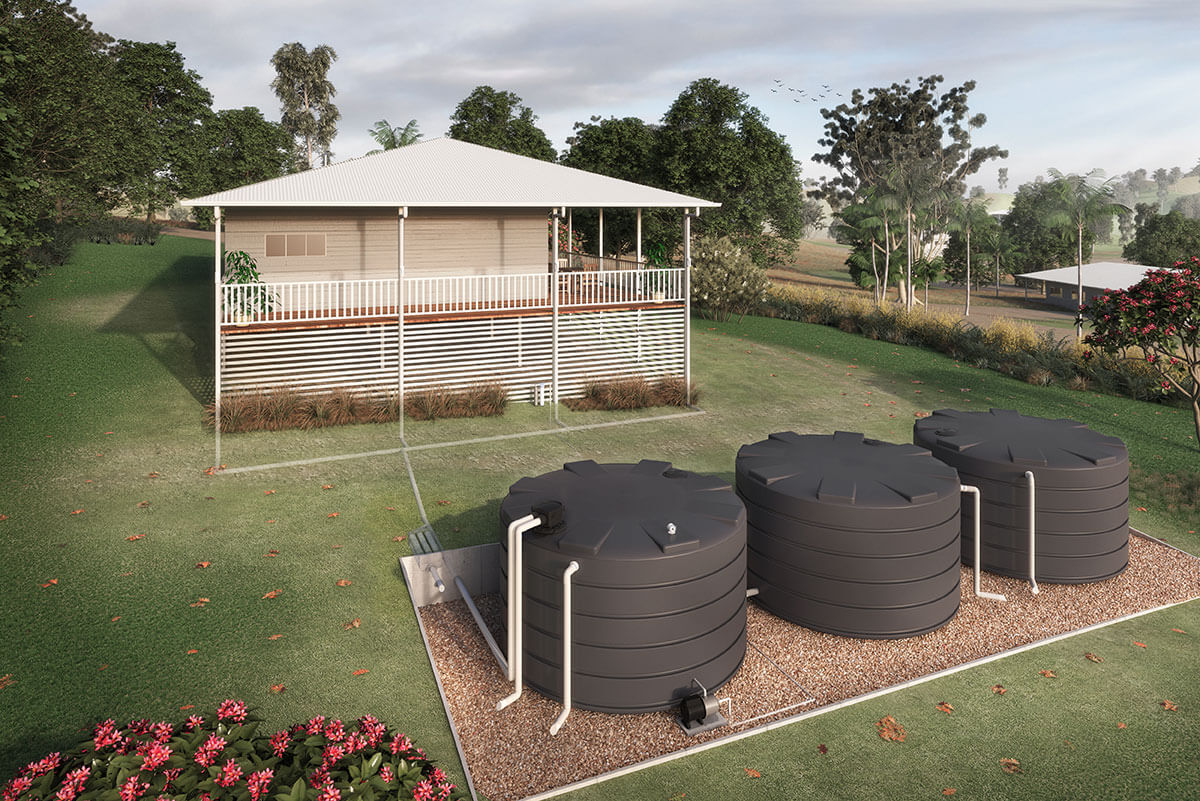
एकड़ - जमीन के ऊपर पॉली टैंक के साथ गीली प्रणाली
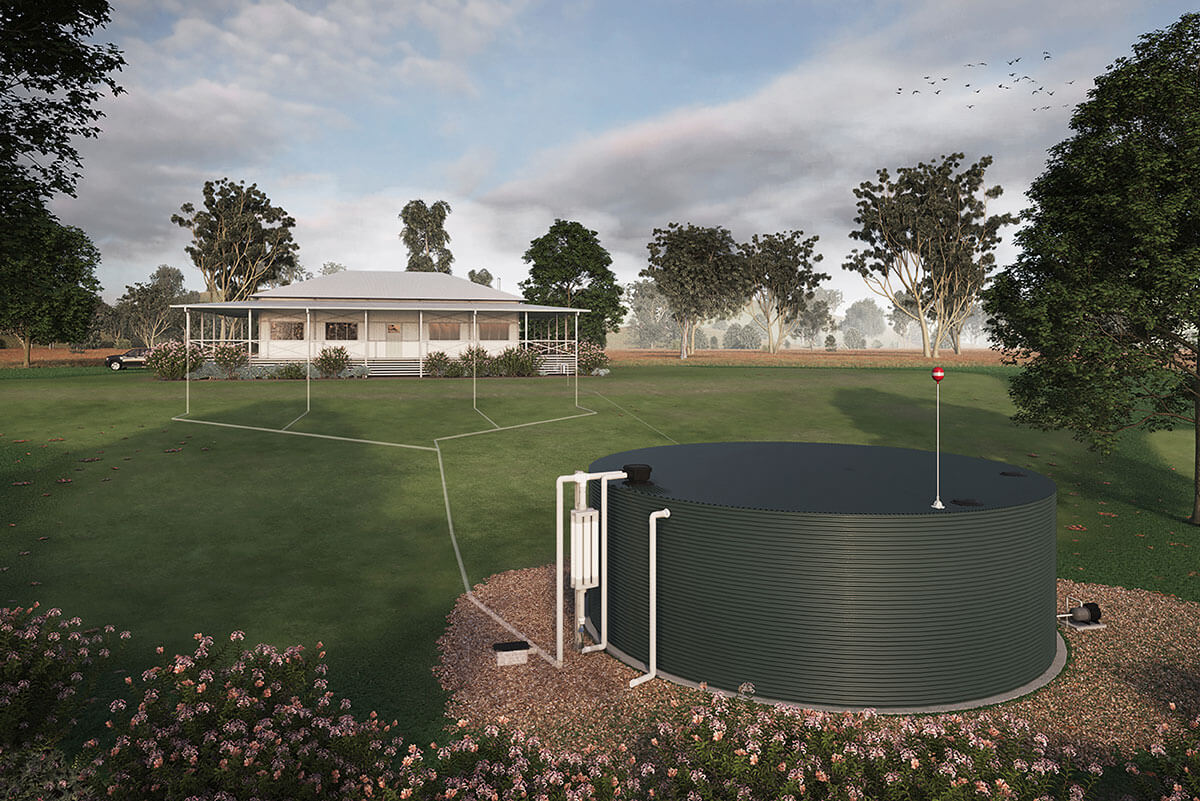
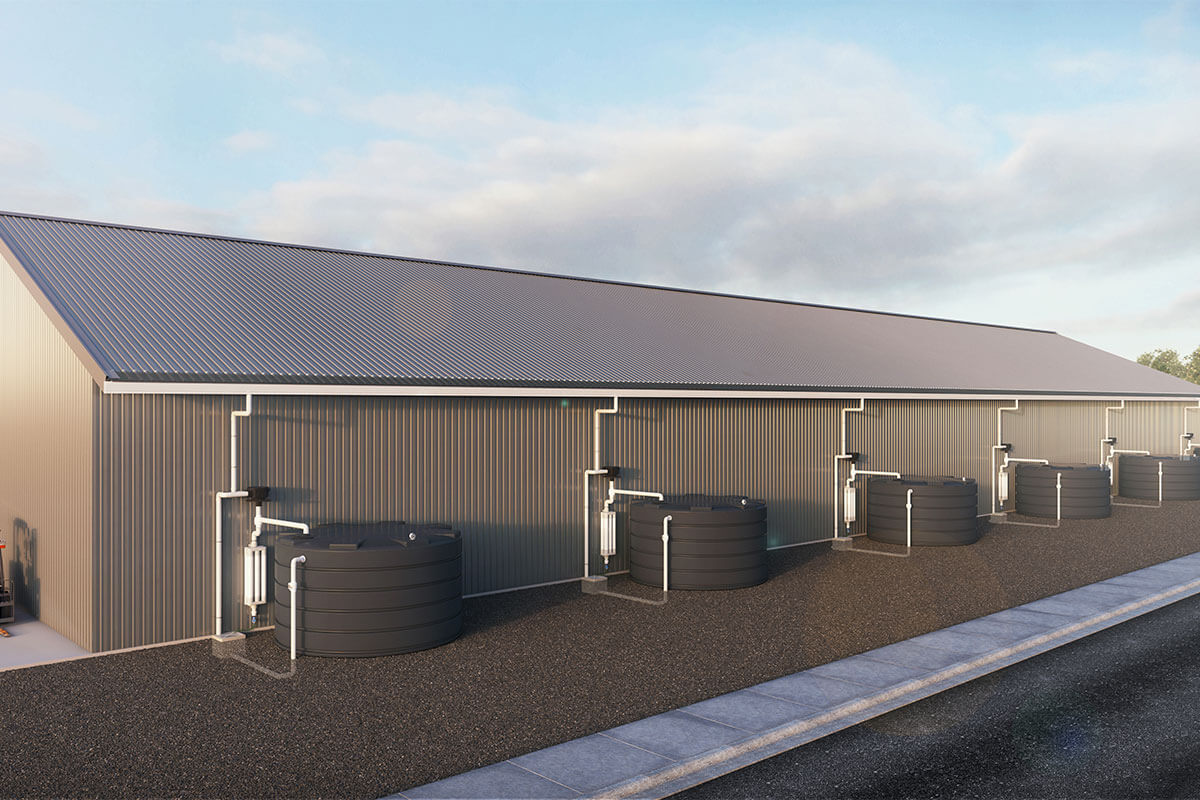
ग्रामीण - जमीन के ऊपर नालीदार टैंक के साथ गीली प्रणाली
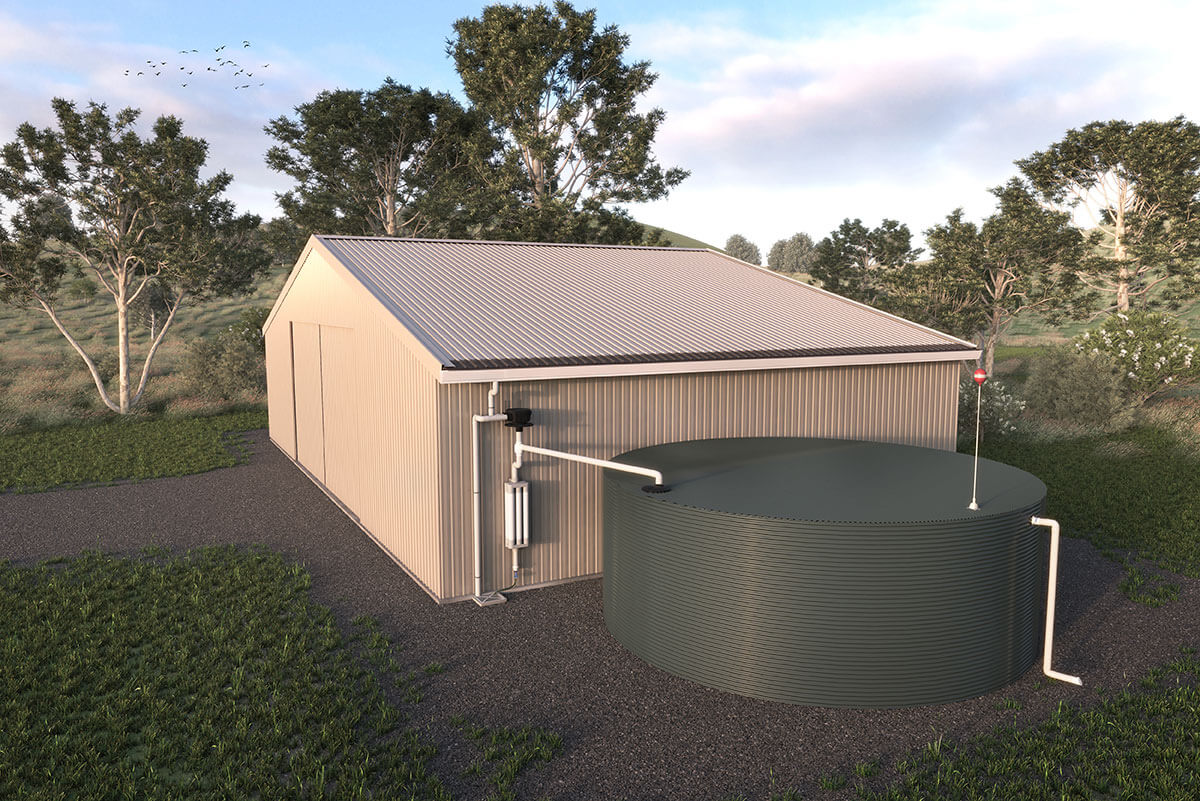
शेड - जमीन के ऊपर नालीदार टैंक के साथ सूखी प्रणाली
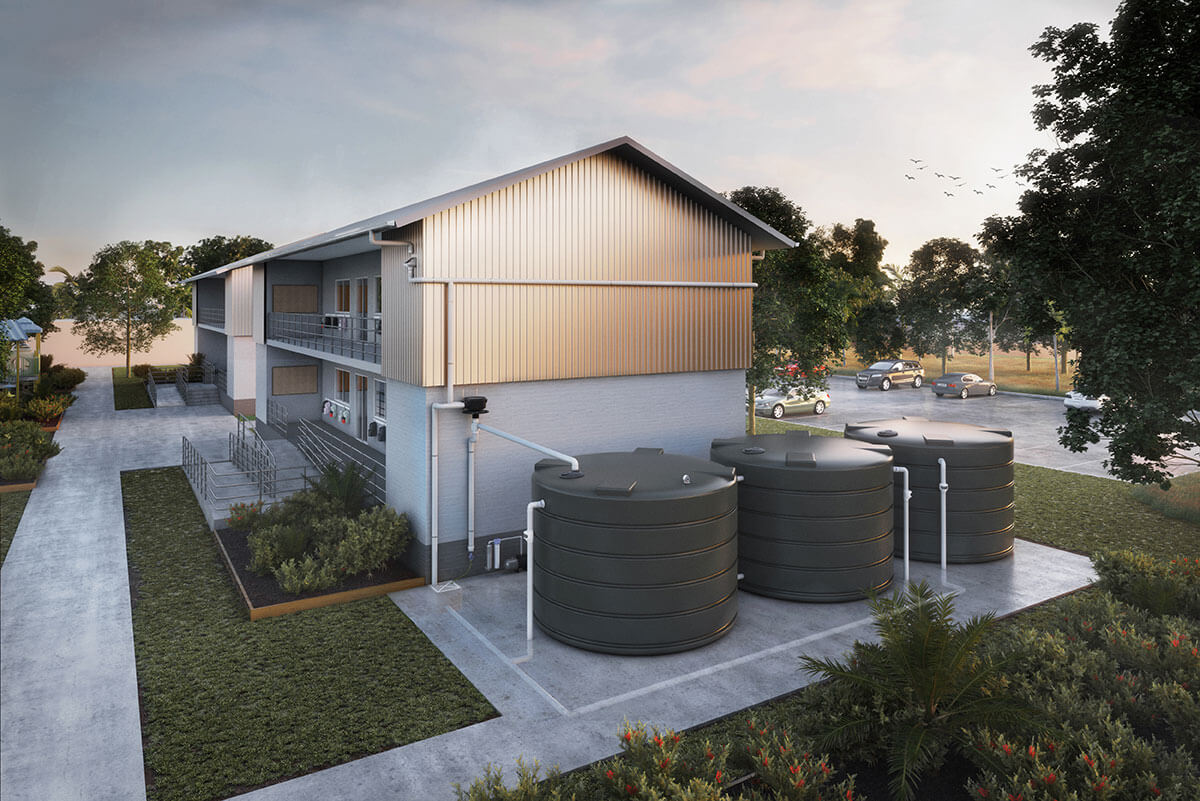
स्कूल - ज़मीन के ऊपर पॉली टैंक के साथ सूखी प्रणाली